


Chapter 5: PDU Linking
101
Pairwise Outlet Groups
The PDU Linking feature offers the "pairwise" functionality for outlet grouping.
Pairwise lets you create auto-named pairs of outlet groups than span multiple
PDUs (master and link units) using the same outlet label. Pairwise simplifies
outlet switching up or down a server by automatically creating multiple outlet
groups, each containing one pair of outlets between PDUs that can be
controlled as a pair-related outlet group.
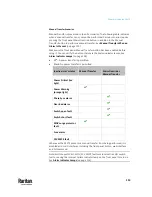
Example: Chain with master and a single link unit
PDU 1 (Master Unit)
Server Load
PDU 2 (Link Unit)
Outlet 1
Server 1
Outlet 1
Outlet 2
Server 2
Outlet 2
Outlet 3
Server 3
Outlet 3
…
…
…
Outlet 20
Server 20
Outlet 20
Using the above example, to power up or down a server, you would typically
switch one outlet of PDU 1 and one outlet of PDU 2. With pairwise, you can
auto-create an outlet group named "Outlet pair 3", and the new group will
automatically contain Outlet 3 from PDU 1 (master) and Outlet 3 from PDU 2
(link). Powering up or down the server only requires switching the "Outlet pair
3" outlet group, allowing for improved accuracy and speed over outlet control.
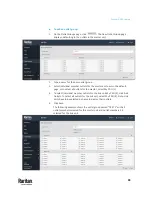
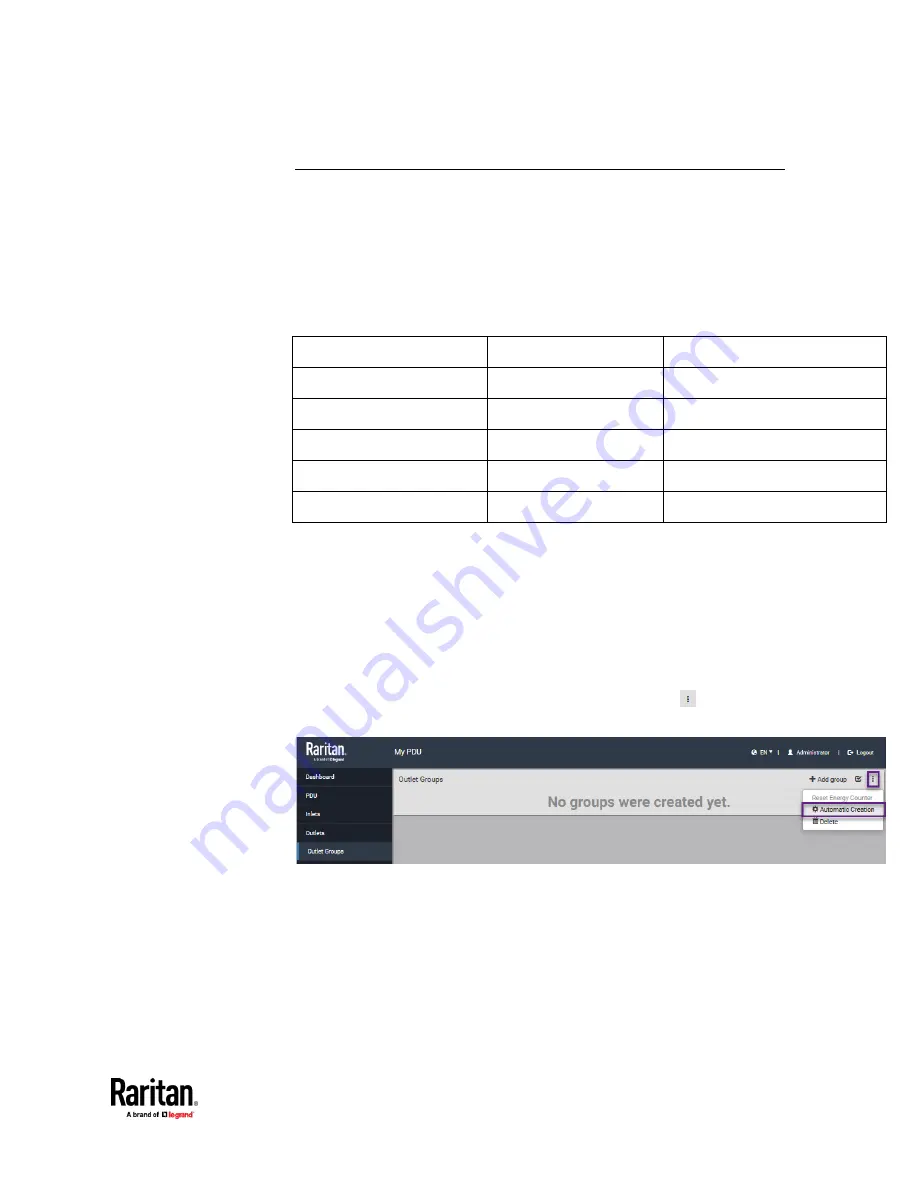
Automatically Create Pairwise Outlet Groups
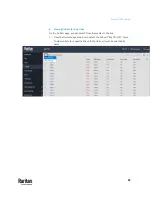
1.
From the Outlet Groups page, from the drop-down menu
select
Automatic Creation.
Содержание Raritan PX3TS
Страница 4: ......
Страница 6: ......
Страница 20: ......
Страница 52: ...Chapter 3 Initial Installation and Configuration 32 Number Device role Master device Slave 1 Slave 2 Slave 3...
Страница 80: ...Chapter 4 Connecting External Equipment Optional 60...
Страница 109: ...Chapter 5 PDU Linking 89...
Страница 117: ...Chapter 5 PDU Linking 97...
Страница 440: ...Chapter 7 Using the Web Interface 420 If wanted you can customize the subject and content of this email in this action...
Страница 441: ...Chapter 7 Using the Web Interface 421...
Страница 464: ...Chapter 7 Using the Web Interface 444...
Страница 465: ...Chapter 7 Using the Web Interface 445 Continued...
Страница 746: ...Appendix A Specifications 726...
Страница 823: ...Appendix I RADIUS Configuration Illustration 803 Note If your PX3TS uses PAP then select PAP...
Страница 824: ...Appendix I RADIUS Configuration Illustration 804 10 Select Standard to the left of the dialog and then click Add...
Страница 825: ...Appendix I RADIUS Configuration Illustration 805 11 Select Filter Id from the list of attributes and click Add...
Страница 828: ...Appendix I RADIUS Configuration Illustration 808 14 The new attribute is added Click OK...
Страница 829: ...Appendix I RADIUS Configuration Illustration 809 15 Click Next to continue...
Страница 860: ...Appendix J Additional PX3TS Information 840...
Страница 890: ...Appendix K Integration 870 3 Click OK...
Страница 900: ......


