


Chapter 4: Connecting External Equipment (Optional)
71
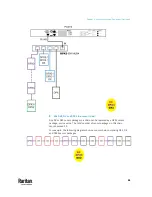
3.
Affix an asset tag to the IT device. Then connect this asset tag to the
composite asset strip by plugging the tag connector into the tag port on
the composite asset strip. For details, see
Connecting Regular Asset Strips
to PX3TS
(on page 65).
4.
(Optional) For a chain, it is highly recommended using the cable ties to
help hold the weight of all connecting cables.
5.
Repeat Step 3 to connect IT devices to the other composite asset strips in
the chain.
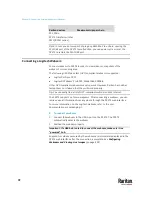
Daisy-Chain Limitations of Composite Asset Strips
There are some limitations when daisy chaining composite asset strips
"AMS-Mx-Z," where x is a number.
•
The maximum cable length between composite asset strips is 2 meters,
but the total cable length cannot exceed 10 meters.
•
The maximum number of composite asset strips that can be daisy chained
depends on the Raritan product you purchased.
•
It is NOT supported to hot swap or hot plug any AMS-Mx-Z in a composite
asset strip chain that has been connected to Raritan's PDU, SRC, or PMC.
Therefore, first disconnect the chain from the device when you need to
swap or add any AMS-Mx-Z to the chain.
Raritan devices
Maximum strips per chain
EMX2-111,
PX2 PDUs,
BCM1 (NOT BCM2 series)
Up to 4 composite asset strips are
supported.
Smart Rack Controller,
EMX2-888,
Up to 6 composite asset strips are
supported.
Содержание Raritan PX3TS
Страница 4: ......
Страница 6: ......
Страница 20: ......
Страница 52: ...Chapter 3 Initial Installation and Configuration 32 Number Device role Master device Slave 1 Slave 2 Slave 3...
Страница 80: ...Chapter 4 Connecting External Equipment Optional 60...
Страница 109: ...Chapter 5 PDU Linking 89...
Страница 117: ...Chapter 5 PDU Linking 97...
Страница 440: ...Chapter 7 Using the Web Interface 420 If wanted you can customize the subject and content of this email in this action...
Страница 441: ...Chapter 7 Using the Web Interface 421...
Страница 464: ...Chapter 7 Using the Web Interface 444...
Страница 465: ...Chapter 7 Using the Web Interface 445 Continued...
Страница 746: ...Appendix A Specifications 726...
Страница 823: ...Appendix I RADIUS Configuration Illustration 803 Note If your PX3TS uses PAP then select PAP...
Страница 824: ...Appendix I RADIUS Configuration Illustration 804 10 Select Standard to the left of the dialog and then click Add...
Страница 825: ...Appendix I RADIUS Configuration Illustration 805 11 Select Filter Id from the list of attributes and click Add...
Страница 828: ...Appendix I RADIUS Configuration Illustration 808 14 The new attribute is added Click OK...
Страница 829: ...Appendix I RADIUS Configuration Illustration 809 15 Click Next to continue...
Страница 860: ...Appendix J Additional PX3TS Information 840...
Страница 890: ...Appendix K Integration 870 3 Click OK...
Страница 900: ......


