


Chapter 6: Using the PX3TS
118
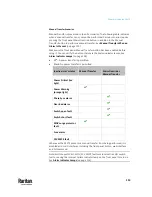
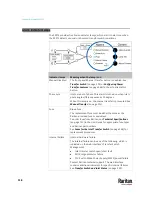
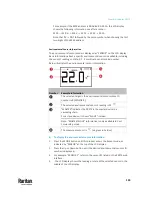
Alarm Indicator Lamps
The PX3TS provides five Alarm indicator lamps, which are lit to alert you when
the PX3TS detects unusual or abnormal transfer switch conditions.
Indicator lamps
Meaning when the lamp is on
Manual Disabled
The front panel Manual Transfer button is disabled. See
Transfer Switch
(on page 193) or
Configuring Power
Transfer Features
(on page 566) for how to disable this
button.
Phase Sync
Inlets are out of phase. This alarm is turned on when inlets'
phase angle difference exceeds 15 degrees.
When this lamp is on, the manual transfer is prevented. See
Manual Transfer
(on page 112).
Fuse
Blown fuse.
The replacement fuse must be either the same as the
Raritan-provided fuse or equivalent.
To order fuses from Raritan, see
Technical Specifications
(on page 721) in the User Guide for appropriate fuse types
and Raritan part numbers.
See
Fuses for the Inlet Transfer Switch
(on page 164) for
replacement procedures.
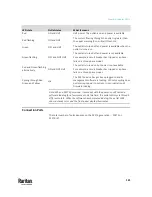
Internal Failure
Internal hardware failure.
The internal failure can be any of the following, which is
indicated on the web interface's Transfer Switch
Management.
•
Inlet transfer switch open/short fault
•
MOV surge protector failure
•
12V Switch Mode Power Supply (SMPS) power failure
Contact Raritan technical support. The web interface
contains additional indicators for specific internal failures.
See
Transfer Switch and Inlet Status
(on page 200).
Содержание Raritan PX3TS
Страница 4: ......
Страница 6: ......
Страница 20: ......
Страница 52: ...Chapter 3 Initial Installation and Configuration 32 Number Device role Master device Slave 1 Slave 2 Slave 3...
Страница 80: ...Chapter 4 Connecting External Equipment Optional 60...
Страница 109: ...Chapter 5 PDU Linking 89...
Страница 117: ...Chapter 5 PDU Linking 97...
Страница 440: ...Chapter 7 Using the Web Interface 420 If wanted you can customize the subject and content of this email in this action...
Страница 441: ...Chapter 7 Using the Web Interface 421...
Страница 464: ...Chapter 7 Using the Web Interface 444...
Страница 465: ...Chapter 7 Using the Web Interface 445 Continued...
Страница 746: ...Appendix A Specifications 726...
Страница 823: ...Appendix I RADIUS Configuration Illustration 803 Note If your PX3TS uses PAP then select PAP...
Страница 824: ...Appendix I RADIUS Configuration Illustration 804 10 Select Standard to the left of the dialog and then click Add...
Страница 825: ...Appendix I RADIUS Configuration Illustration 805 11 Select Filter Id from the list of attributes and click Add...
Страница 828: ...Appendix I RADIUS Configuration Illustration 808 14 The new attribute is added Click OK...
Страница 829: ...Appendix I RADIUS Configuration Illustration 809 15 Click Next to continue...
Страница 860: ...Appendix J Additional PX3TS Information 840...
Страница 890: ...Appendix K Integration 870 3 Click OK...
Страница 900: ......


