


Chapter 7: Using the Web Interface
207
▪
Click
to select an option.
▪
Adjust the numeric values.
▪
Select or deselect the checkbox.
▪
For time-related fields, if you do not prefer the option selection using
, you can type a value manually which must include a time unit,
such as '50 s'. See
Time Units
(on page 214).
In the following table, those fields marked with * are available on an
outlet-switching capable model only.
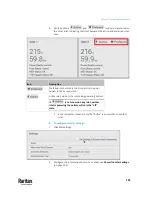
Field
Function
Note
Name
Customizes the device name.
*Relay behavior on
power loss
Selects an operating mode to determine
the latching relay behavior when PDU
power is lost.
▪
Options: Non-latching and Latching
▪
Non-latching has all relays open at
the power loss while latching has all
relays remain unchanged at the
power loss.
See
PX3TS Latching Relay Behavior
(on
page 212).
*Outlet state on
device startup
(for non-latching
mode only)
Determines the initial power state of ALL
outlets after the PX3TS powers up.
▪
Options: on, off, and last known
See
Options for Outlet State on Startup
(on page 212).
▪
After removing power from the PDU,
you must wait for a minimum of 10
seconds before powering it up again.
Otherwise, the default outlet state
settings may not work properly.
▪
You can override the global outlet
state setting on a per-outlet basis so
specific outlets behave differently on
startup. See
Individual Outlet Pages
(on page 232).
▪
This setting works only when 'Relay
behavior on power loss' is set to
Non-latching
. This is because all
relays keep their states unchanged in
the latching mode regardless of the
power supply status.
Содержание Raritan PX3TS
Страница 4: ......
Страница 6: ......
Страница 20: ......
Страница 52: ...Chapter 3 Initial Installation and Configuration 32 Number Device role Master device Slave 1 Slave 2 Slave 3...
Страница 80: ...Chapter 4 Connecting External Equipment Optional 60...
Страница 109: ...Chapter 5 PDU Linking 89...
Страница 117: ...Chapter 5 PDU Linking 97...
Страница 440: ...Chapter 7 Using the Web Interface 420 If wanted you can customize the subject and content of this email in this action...
Страница 441: ...Chapter 7 Using the Web Interface 421...
Страница 464: ...Chapter 7 Using the Web Interface 444...
Страница 465: ...Chapter 7 Using the Web Interface 445 Continued...
Страница 746: ...Appendix A Specifications 726...
Страница 823: ...Appendix I RADIUS Configuration Illustration 803 Note If your PX3TS uses PAP then select PAP...
Страница 824: ...Appendix I RADIUS Configuration Illustration 804 10 Select Standard to the left of the dialog and then click Add...
Страница 825: ...Appendix I RADIUS Configuration Illustration 805 11 Select Filter Id from the list of attributes and click Add...
Страница 828: ...Appendix I RADIUS Configuration Illustration 808 14 The new attribute is added Click OK...
Страница 829: ...Appendix I RADIUS Configuration Illustration 809 15 Click Next to continue...
Страница 860: ...Appendix J Additional PX3TS Information 840...
Страница 890: ...Appendix K Integration 870 3 Click OK...
Страница 900: ......


