


75
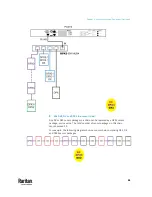
The PDU Linking feature allows the linking configuration of a single master PDU
unit to multiple link units for faster and more efficient power management.
Only one master unit is connected to the network in PDU Linking, which allows
a cost-efficient PDU operation and networking infrastructure.
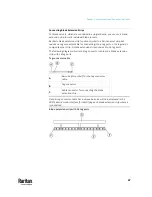
The master PDU is the first PDU in the chain with up to seven link units
connected in sequence in the chain. The master PDU has full knowledge of the
location of the connected link units in the chain, as well as the power and
environmental information of all link units.
When you create a master and link configuration in a chain, you log in to the
master unit with visibility to control both the master unit and the connected
link units from within the GUI, SNMP, and CLI.
The PDU Linking feature also allows the Raritan cascading technology, which
enables multiple PDUs to share network connectivity by cascading them
through the USB or Ethernet interface.
The administrator privilege is required for all management actions (adding,
configuring, releasing) of the PDU Linking feature. Each PDU in the chain can be
monitored and managed from anywhere by the network protocols HTTP(S),
SNMP, SSH, Telnet, and Modbus.
All units in the linked chain should be the same model PDU. All units must run
the same firmware version, which can be upgraded respectively for each unit in
the chain.
In This Chapter
FAQs .................................................................................................................... 76
PDU Linking in the Web GUI ............................................................................... 78
Displays for Master and Link Units ................................................................... 104
PDU Linking in the CLI ....................................................................................... 106
Chapter 5
PDU Linking
Содержание Raritan PX3TS
Страница 4: ......
Страница 6: ......
Страница 20: ......
Страница 52: ...Chapter 3 Initial Installation and Configuration 32 Number Device role Master device Slave 1 Slave 2 Slave 3...
Страница 80: ...Chapter 4 Connecting External Equipment Optional 60...
Страница 109: ...Chapter 5 PDU Linking 89...
Страница 117: ...Chapter 5 PDU Linking 97...
Страница 440: ...Chapter 7 Using the Web Interface 420 If wanted you can customize the subject and content of this email in this action...
Страница 441: ...Chapter 7 Using the Web Interface 421...
Страница 464: ...Chapter 7 Using the Web Interface 444...
Страница 465: ...Chapter 7 Using the Web Interface 445 Continued...
Страница 746: ...Appendix A Specifications 726...
Страница 823: ...Appendix I RADIUS Configuration Illustration 803 Note If your PX3TS uses PAP then select PAP...
Страница 824: ...Appendix I RADIUS Configuration Illustration 804 10 Select Standard to the left of the dialog and then click Add...
Страница 825: ...Appendix I RADIUS Configuration Illustration 805 11 Select Filter Id from the list of attributes and click Add...
Страница 828: ...Appendix I RADIUS Configuration Illustration 808 14 The new attribute is added Click OK...
Страница 829: ...Appendix I RADIUS Configuration Illustration 809 15 Click Next to continue...
Страница 860: ...Appendix J Additional PX3TS Information 840...
Страница 890: ...Appendix K Integration 870 3 Click OK...
Страница 900: ......


