


Chapter 3: Initial Installation and Configuration
16
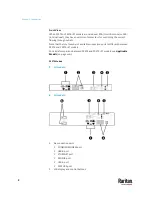
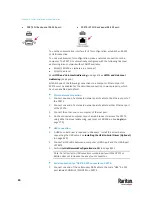
Dual Ethernet Connection
One PX3TS device has two Ethernet (LAN) ports:
•
ETH 10/100/1000 (marked in
green
) supports up to 1000 Mbps. This is
"ETH1".
•
ETH 10/100 (marked in
white
) supports up to 100 Mbps. This is "ETH2".
For more information on the two ports, see .
You can connect both ports to
different
subnets (networks) and therefore
obtain two IP addresses for wired networking. It is strongly recommended that
you DO NOT connect both ports to the same subnet to avoid potential issues.
Contact your IT department if you are not sure whether the two Ethernet ports
are connecting to the same or different subnets.
Exception: A USB-cascading chain must connect to "only one" network. Do NOT
connect both Ethernet ports of any PX3TS master or slave device to the LAN. See
Cascading Multiple PX3TS Devices for Sharing Ethernet Connectivity
(on page
27).
Check list when connecting both ports to the networks:
•
Both Ethernet interfaces are connecting to different subnets.
•
Both Ethernet interfaces have been enabled. By default both are enabled.
See
Device Info
(on page 155) and
Ethernet Interface Settings
(on page
314).
•
Both Ethernet interfaces are configured with proper IPv4 and/or IPv6
settings. See
Wired Network Settings
(on page 311).
▪
It is NOT required that the two Ethernet interfaces share similar
network settings. For example, you can enable IPv4 settings in one
interface but enable IPv6 settings in the other, or apply static IP to one
but DHCP IP to the other.
•
The cascading mode is disabled. By default it is disabled. See
Setting the
Cascading Mode
(on page 328).
Configuring the PX3TS
You can initially configure the PX3TS via one of the following:
•
A TCP/IP network that supports DHCP
•
A mobile device with PDView installed
•
A computer physically connected to the PX3TS
Configuration via a DHCP-enabled network:
1.
Connect the PX3TS to a DHCP IPv4 network. See
Connecting the PX3TS to
Your Network
(on page 13).
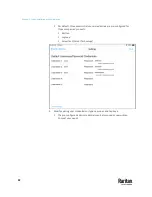
2.
Retrieve the DHCP-assigned IPv4 address. Use the front panel LCD display
to retrieve it.
Содержание Raritan PX3TS
Страница 4: ......
Страница 6: ......
Страница 20: ......
Страница 52: ...Chapter 3 Initial Installation and Configuration 32 Number Device role Master device Slave 1 Slave 2 Slave 3...
Страница 80: ...Chapter 4 Connecting External Equipment Optional 60...
Страница 109: ...Chapter 5 PDU Linking 89...
Страница 117: ...Chapter 5 PDU Linking 97...
Страница 440: ...Chapter 7 Using the Web Interface 420 If wanted you can customize the subject and content of this email in this action...
Страница 441: ...Chapter 7 Using the Web Interface 421...
Страница 464: ...Chapter 7 Using the Web Interface 444...
Страница 465: ...Chapter 7 Using the Web Interface 445 Continued...
Страница 746: ...Appendix A Specifications 726...
Страница 823: ...Appendix I RADIUS Configuration Illustration 803 Note If your PX3TS uses PAP then select PAP...
Страница 824: ...Appendix I RADIUS Configuration Illustration 804 10 Select Standard to the left of the dialog and then click Add...
Страница 825: ...Appendix I RADIUS Configuration Illustration 805 11 Select Filter Id from the list of attributes and click Add...
Страница 828: ...Appendix I RADIUS Configuration Illustration 808 14 The new attribute is added Click OK...
Страница 829: ...Appendix I RADIUS Configuration Illustration 809 15 Click Next to continue...
Страница 860: ...Appendix J Additional PX3TS Information 840...
Страница 890: ...Appendix K Integration 870 3 Click OK...
Страница 900: ......


