


Chapter 6: Using the PX3TS
167
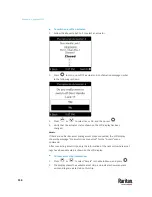
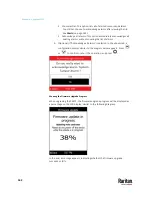
9.
Reconnect the inlet with the fuse replaced to power, if it was disconnected
in Step 4.
10.
(Optional) You can perform manual transfer back to that inlet, if preferred.
See
Manual Transfer
(on page 112).
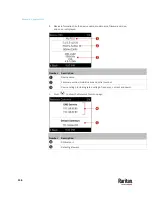
Overcurrent Protectors for Outlets
PX3TS models rated over 20A (North American) or 16A (international) contain
overcurrent protectors for outlets, which are usually branch circuit breakers.
These circuit breakers automatically trip (disconnect power) when the current
flowing through the circuit breaker exceeds its rating.
If the circuit breaker switches off power, the front panel display shows:
•
CbE
, which means "circuit breaker error." See
Overcurrent Protector
Information
(on page 130).
At the same time, the internal beeper turns on. See
Beeper
(on page 168).
When a circuit breaker trips, power flow ceases to all outlets connected to it.
You must manually reset the circuit breaker so that affected outlets can
resume normal operation.
Comparison: Fuses for the inlet transfer switch protect the inlet transfer switch
from overload. Overcurrent protectors for outlets, if available, protect
associated outlets from overload. The rating of a fuse for the inlet transfer
switch is higher than the rating of an overcurrent protector for outlets. See
Fuses for the Inlet Transfer Switch
(on page 164).
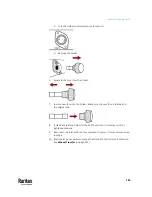
Resetting the Button-Type Circuit Breaker
Your button-type circuit breakers may look slightly different from the images
shown in this section, but the reset procedure remains the same.
To reset the button-type breakers:
1.
Locate the breaker whose ON button is up, indicating that the breaker has
tripped.
2.
Examine your PX3TS and the connected equipment to remove or resolve
the cause that results in the overload or short circuit.
This step is required,
or you cannot proceed with the next step.
Содержание Raritan PX3TS
Страница 4: ......
Страница 6: ......
Страница 20: ......
Страница 52: ...Chapter 3 Initial Installation and Configuration 32 Number Device role Master device Slave 1 Slave 2 Slave 3...
Страница 80: ...Chapter 4 Connecting External Equipment Optional 60...
Страница 109: ...Chapter 5 PDU Linking 89...
Страница 117: ...Chapter 5 PDU Linking 97...
Страница 440: ...Chapter 7 Using the Web Interface 420 If wanted you can customize the subject and content of this email in this action...
Страница 441: ...Chapter 7 Using the Web Interface 421...
Страница 464: ...Chapter 7 Using the Web Interface 444...
Страница 465: ...Chapter 7 Using the Web Interface 445 Continued...
Страница 746: ...Appendix A Specifications 726...
Страница 823: ...Appendix I RADIUS Configuration Illustration 803 Note If your PX3TS uses PAP then select PAP...
Страница 824: ...Appendix I RADIUS Configuration Illustration 804 10 Select Standard to the left of the dialog and then click Add...
Страница 825: ...Appendix I RADIUS Configuration Illustration 805 11 Select Filter Id from the list of attributes and click Add...
Страница 828: ...Appendix I RADIUS Configuration Illustration 808 14 The new attribute is added Click OK...
Страница 829: ...Appendix I RADIUS Configuration Illustration 809 15 Click Next to continue...
Страница 860: ...Appendix J Additional PX3TS Information 840...
Страница 890: ...Appendix K Integration 870 3 Click OK...
Страница 900: ......


