


Chapter 7: Using the Web Interface
425
Placeholders for Custom Messages
Actions of "Send email" and "Send SMS message" allow you to customize event
messages. See
Send Email
(on page 404) or
Send SMS Message
(on page 408).
In addition, you can add custom text message to the "Send snapshots via
email" action. See
Send Snapshots via Email
(on page 409).
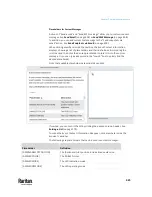
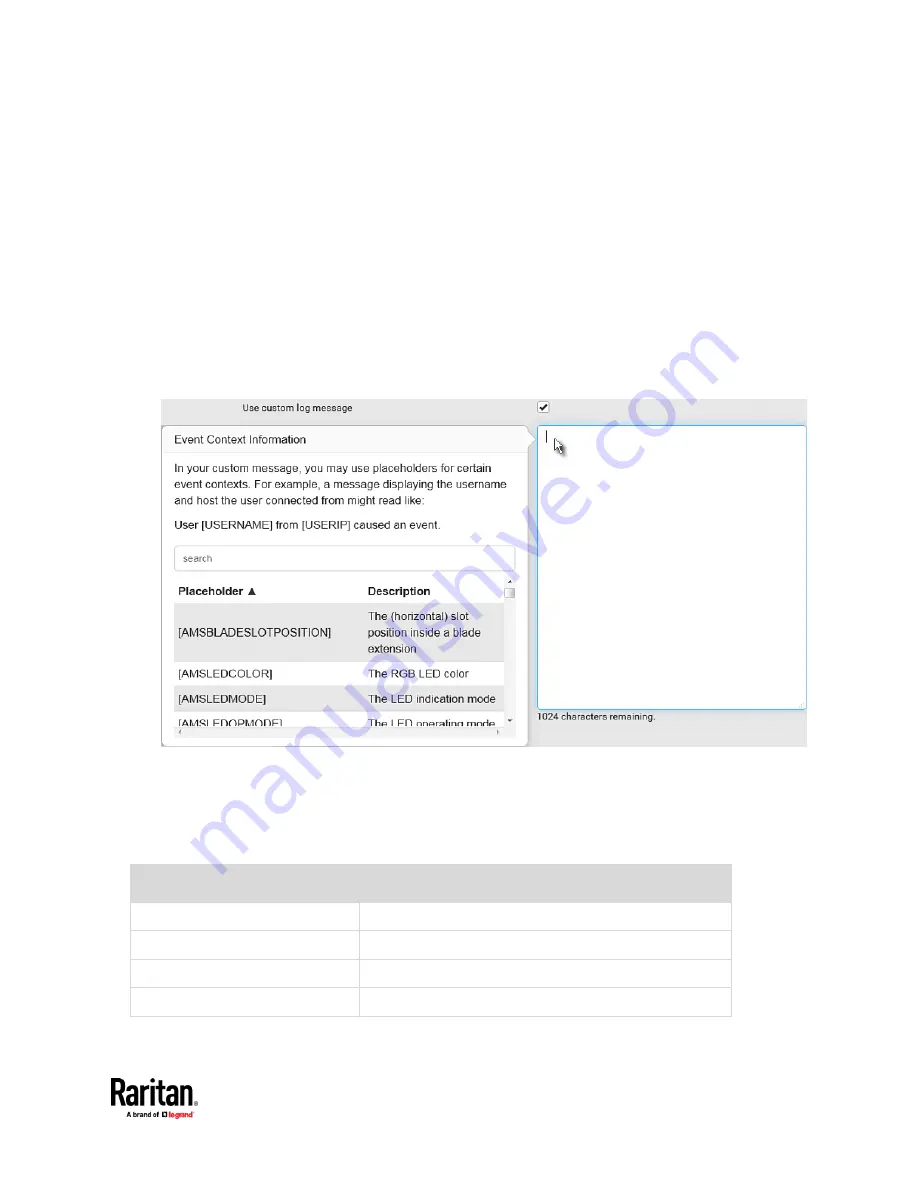
When clicking anywhere inside the text box, the Event Context Information
displays, showing a list of placeholders and their definitions. Simply drag the
scroll bar and then click the desired placeholder to insert it into the custom
message. Or you can type a keyword in the "search" box to quickly find the
desired placeholder.
Note that available placeholders are model dependent.
If wanted, you can resort the list by clicking the desired column header. See
Sorting a List
(on page 179).
To make the Event Context Information disappear, click anywhere inside the
browser's window.
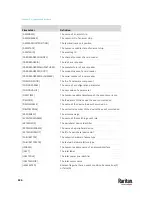
The following are placeholders that can be used in custom messages.
Placeholder
Definition
[AMSBLADESLOTPOSITION]
The (horizontal) slot position inside a blade extension
[AMSLEDCOLOR]
The RGB LED color
[AMSLEDMODE]
The LED indication mode
[AMSLEDOPMODE]
The LED operating mode
Содержание Raritan PX3TS
Страница 4: ......
Страница 6: ......
Страница 20: ......
Страница 52: ...Chapter 3 Initial Installation and Configuration 32 Number Device role Master device Slave 1 Slave 2 Slave 3...
Страница 80: ...Chapter 4 Connecting External Equipment Optional 60...
Страница 109: ...Chapter 5 PDU Linking 89...
Страница 117: ...Chapter 5 PDU Linking 97...
Страница 440: ...Chapter 7 Using the Web Interface 420 If wanted you can customize the subject and content of this email in this action...
Страница 441: ...Chapter 7 Using the Web Interface 421...
Страница 464: ...Chapter 7 Using the Web Interface 444...
Страница 465: ...Chapter 7 Using the Web Interface 445 Continued...
Страница 746: ...Appendix A Specifications 726...
Страница 823: ...Appendix I RADIUS Configuration Illustration 803 Note If your PX3TS uses PAP then select PAP...
Страница 824: ...Appendix I RADIUS Configuration Illustration 804 10 Select Standard to the left of the dialog and then click Add...
Страница 825: ...Appendix I RADIUS Configuration Illustration 805 11 Select Filter Id from the list of attributes and click Add...
Страница 828: ...Appendix I RADIUS Configuration Illustration 808 14 The new attribute is added Click OK...
Страница 829: ...Appendix I RADIUS Configuration Illustration 809 15 Click Next to continue...
Страница 860: ...Appendix J Additional PX3TS Information 840...
Страница 890: ...Appendix K Integration 870 3 Click OK...
Страница 900: ......


