Chapter 10: Using SCP Commands
717
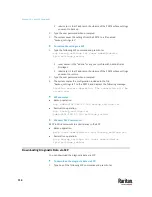
Scenario 3: Specify a new filename but use the default SCP port
▪
SSH/SCP port is the default (22), and the accessed PX3TS is a standalone device.
▪
Renaming the raw configuration file is wanted.
scp <user name>@<device ip>:/raw_config.txt <filename>
Scenario 4: Specify a different SCP port and a new filename
▪
SSH/SCP port is NOT the default (22), or the accessed PX3TS is a Port-Forwarding slave
device.
▪
Renaming the raw configuration file is wanted.
scp -P <port> <user name>@<device ip>:/raw_config.txt <filename>
▪
<user name>
is the "admin" or any user profile with Administrator
Privileges.
▪
<device ip>
is the IP address or hostname of the PX3TS whose data you
want to download.
▪
<port> is the current SSH/SCP port number, or the port number of a
specific slave device in the Port-Forwarding chain.
▪
<filename>
is the new filename of the downloaded file.
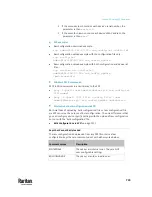
2.
Type the password when prompted.
3.
The system downloads the specified data from the PX3TS onto your
computer.
▪
If you do NOT specify a new filename in the command, such as
Scenarios 1 or 2, the downloaded file's default name is
"raw_config.txt."
▪
If you specify a new filename in the command, such as Scenarios 3 or 4,
the downloaded file is renamed accordingly.
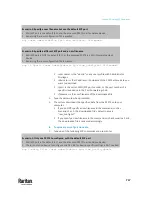
To upload raw configuration data:
1.
Type one of the following SCP commands and press Enter.
Scenario 1: Only one PX3TS to configure, with the default SCP port
▪
SSH/SCP port is the default (22), and the accessed PX3TS is a standalone device.
▪
There is only one device to configure so a CSV file for device-specific settings is NOT needed.
scp <config file> <user name>@<device ip>:/raw_config_update
Содержание Raritan PX3TS
Страница 4: ......
Страница 6: ......
Страница 20: ......
Страница 52: ...Chapter 3 Initial Installation and Configuration 32 Number Device role Master device Slave 1 Slave 2 Slave 3...
Страница 80: ...Chapter 4 Connecting External Equipment Optional 60...
Страница 109: ...Chapter 5 PDU Linking 89...
Страница 117: ...Chapter 5 PDU Linking 97...
Страница 440: ...Chapter 7 Using the Web Interface 420 If wanted you can customize the subject and content of this email in this action...
Страница 441: ...Chapter 7 Using the Web Interface 421...
Страница 464: ...Chapter 7 Using the Web Interface 444...
Страница 465: ...Chapter 7 Using the Web Interface 445 Continued...
Страница 746: ...Appendix A Specifications 726...
Страница 823: ...Appendix I RADIUS Configuration Illustration 803 Note If your PX3TS uses PAP then select PAP...
Страница 824: ...Appendix I RADIUS Configuration Illustration 804 10 Select Standard to the left of the dialog and then click Add...
Страница 825: ...Appendix I RADIUS Configuration Illustration 805 11 Select Filter Id from the list of attributes and click Add...
Страница 828: ...Appendix I RADIUS Configuration Illustration 808 14 The new attribute is added Click OK...
Страница 829: ...Appendix I RADIUS Configuration Illustration 809 15 Click Next to continue...
Страница 860: ...Appendix J Additional PX3TS Information 840...
Страница 890: ...Appendix K Integration 870 3 Click OK...
Страница 900: ......


