


Chapter 6: Using the PX3TS
155
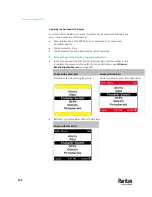
▪
The number of tags includes both the tags attached to the asset strip
and those attached to the blade extension strip, if any.
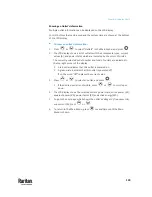
3.
Press
to show this asset strip's details, including:
▪
State - strip status.
▪
Main Tags - number of the tags attached to the asset strip.
▪
Blade Tags - number of the tags attached to the blade extension
strip(s), if any.
Note: The 'Blade Tags' information appears only when there are tags
detected on the connected blade extension strip.
▪
Type - the asset strip type.
▪
Numbering - the numbering mode. See
Asset Strip
(on page 281).
▪
Offset - the starting number of the rack unit numbering.
▪
Orientation - the strip's orientation.
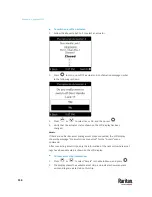
4.
Press
again to show a list of available tags and their information.
▪
When the list exceeds one page, the currently-selected main tag and
total of available main tags are indicated in the top-right corner of the
display.
▪
If the desired tag is not visible, press
or
to scroll up or
down.
5.
If any blade extension strip is connected to this asset strip, select it and
Press
to view a list of available tags and asset IDs on this extension
strip.
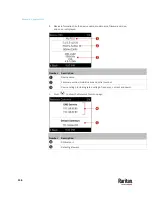
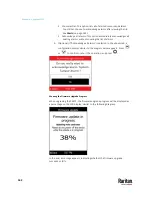
Device Info
The display shows the device's information, network and IPv4/IPv6 settings
through various pages. Page numbers are indicated in the top-right corner of
the LCD display.
To show the device information:
1.
Press
or
to select "Device Info" in the Main Menu, and press
.
Device information similar to the following diagram displays.
Содержание Raritan PX3TS
Страница 4: ......
Страница 6: ......
Страница 20: ......
Страница 52: ...Chapter 3 Initial Installation and Configuration 32 Number Device role Master device Slave 1 Slave 2 Slave 3...
Страница 80: ...Chapter 4 Connecting External Equipment Optional 60...
Страница 109: ...Chapter 5 PDU Linking 89...
Страница 117: ...Chapter 5 PDU Linking 97...
Страница 440: ...Chapter 7 Using the Web Interface 420 If wanted you can customize the subject and content of this email in this action...
Страница 441: ...Chapter 7 Using the Web Interface 421...
Страница 464: ...Chapter 7 Using the Web Interface 444...
Страница 465: ...Chapter 7 Using the Web Interface 445 Continued...
Страница 746: ...Appendix A Specifications 726...
Страница 823: ...Appendix I RADIUS Configuration Illustration 803 Note If your PX3TS uses PAP then select PAP...
Страница 824: ...Appendix I RADIUS Configuration Illustration 804 10 Select Standard to the left of the dialog and then click Add...
Страница 825: ...Appendix I RADIUS Configuration Illustration 805 11 Select Filter Id from the list of attributes and click Add...
Страница 828: ...Appendix I RADIUS Configuration Illustration 808 14 The new attribute is added Click OK...
Страница 829: ...Appendix I RADIUS Configuration Illustration 809 15 Click Next to continue...
Страница 860: ...Appendix J Additional PX3TS Information 840...
Страница 890: ...Appendix K Integration 870 3 Click OK...
Страница 900: ......


