


Appendix C: Configuration or Firmware Upgrade with a USB Drive
739
Note: Each value in the file must be separated by an equal sign (=), without
any surrounding spaces.
•
Multi-line values are supported by using the
Here Document Syntax
with a
user-chosen delimiter.
The following illustration declares a value in two lines. You can replace the
delimiter
EOF
with other delimiter strings.
key<<EOF
value line 1
value line 2
EOF
Note: The line break before the closing EOF is not part of the value. If a line
break is required in the value, insert an additional empty line before the
closing EOF.
Special configuration keys:
There are 3 special configuration keys that are prefixed with
magic:
.
▪
A special key that sets a user account's password without knowing the
firmware's internal encryption/hashing algorithms is implemented.
Example:
magic:users[1].cleartext_password=joshua
▪
Two special keys that set the SNMPv3 passphrases without knowing
the firmware's internal encryption/hashing algorithms are
implemented.
Examples:
magic:users[1].snmp_v3.auth_phrase=swordfish
magic:users[1].snmp_v3.priv_phrase=opensesame
To configure device-specific settings:
1.
Make sure the device list configuration file "devices.csv" is available in the
USB drive. See
devices.csv
(on page 741)
2.
In the "config.txt" file, refer each device-specific configuration key to a
specific column in the "devices.csv" file. The syntax is:
${column}
, where
"column" is a column number.
Examples:
net.interfaces[eth0].ipv4.static.addr_cidr.addr=${4
}
pdu.name=${16}
Содержание Raritan PX3TS
Страница 4: ......
Страница 6: ......
Страница 20: ......
Страница 52: ...Chapter 3 Initial Installation and Configuration 32 Number Device role Master device Slave 1 Slave 2 Slave 3...
Страница 80: ...Chapter 4 Connecting External Equipment Optional 60...
Страница 109: ...Chapter 5 PDU Linking 89...
Страница 117: ...Chapter 5 PDU Linking 97...
Страница 440: ...Chapter 7 Using the Web Interface 420 If wanted you can customize the subject and content of this email in this action...
Страница 441: ...Chapter 7 Using the Web Interface 421...
Страница 464: ...Chapter 7 Using the Web Interface 444...
Страница 465: ...Chapter 7 Using the Web Interface 445 Continued...
Страница 746: ...Appendix A Specifications 726...
Страница 823: ...Appendix I RADIUS Configuration Illustration 803 Note If your PX3TS uses PAP then select PAP...
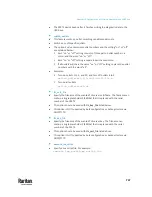
Страница 824: ...Appendix I RADIUS Configuration Illustration 804 10 Select Standard to the left of the dialog and then click Add...
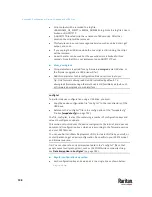
Страница 825: ...Appendix I RADIUS Configuration Illustration 805 11 Select Filter Id from the list of attributes and click Add...
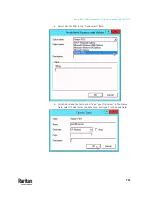
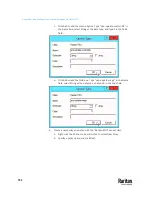
Страница 828: ...Appendix I RADIUS Configuration Illustration 808 14 The new attribute is added Click OK...
Страница 829: ...Appendix I RADIUS Configuration Illustration 809 15 Click Next to continue...
Страница 860: ...Appendix J Additional PX3TS Information 840...
Страница 890: ...Appendix K Integration 870 3 Click OK...
Страница 900: ......


