


Chapter 8: Using SNMP
516
2.
In the SNMP Notifications section, enable the SNMP notification feature,
and configure related fields. For details, refer to:
▪
SNMPv2c Notifications
(on page 516)
▪
SNMPv3 Notifications
(on page 517)
Note: Any changes made to the 'SNMP Notifications' section on the SNMP page
will update the settings of the System SNMP Notification Action, and vice versa.
See
Available Actions
(on page 394).
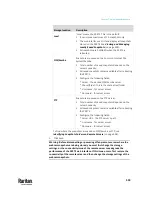
SNMPv2c Notifications
1.
Choose Device Settings > Network Services > SNMP.
2.
In the SNMP Agent, make sure the Enable SNMP v1/v2c checkbox is
selected.
3.
In the SNMP Notifications section, make sure the 'Enable SNMP
notifications' checkbox is selected.
4.
Select 'SNMPv2c trap' or 'SNMPv2c inform' as the notification type.
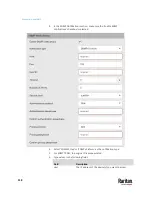
5.
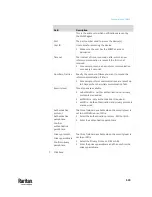
Type values in the following fields.
Field
Description
Timeout
The interval of time, in seconds, after which a new
inform communication is resent if the first is not
received.
▪
For example, resend a new inform communication
Содержание Raritan PX3TS
Страница 4: ......
Страница 6: ......
Страница 20: ......
Страница 52: ...Chapter 3 Initial Installation and Configuration 32 Number Device role Master device Slave 1 Slave 2 Slave 3...
Страница 80: ...Chapter 4 Connecting External Equipment Optional 60...
Страница 109: ...Chapter 5 PDU Linking 89...
Страница 117: ...Chapter 5 PDU Linking 97...
Страница 440: ...Chapter 7 Using the Web Interface 420 If wanted you can customize the subject and content of this email in this action...
Страница 441: ...Chapter 7 Using the Web Interface 421...
Страница 464: ...Chapter 7 Using the Web Interface 444...
Страница 465: ...Chapter 7 Using the Web Interface 445 Continued...
Страница 746: ...Appendix A Specifications 726...
Страница 823: ...Appendix I RADIUS Configuration Illustration 803 Note If your PX3TS uses PAP then select PAP...
Страница 824: ...Appendix I RADIUS Configuration Illustration 804 10 Select Standard to the left of the dialog and then click Add...
Страница 825: ...Appendix I RADIUS Configuration Illustration 805 11 Select Filter Id from the list of attributes and click Add...
Страница 828: ...Appendix I RADIUS Configuration Illustration 808 14 The new attribute is added Click OK...
Страница 829: ...Appendix I RADIUS Configuration Illustration 809 15 Click Next to continue...
Страница 860: ...Appendix J Additional PX3TS Information 840...
Страница 890: ...Appendix K Integration 870 3 Click OK...
Страница 900: ......


