


Chapter 7: Using the Web Interface
434
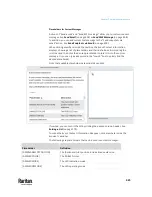
After the new action is created, follow the procedure below to create an event
rule that triggers the load shedding mode when the contact closure sensor
enters the alarmed state. This event rule involves the following:
•
Event: Peripheral Device Slot > Slot 1 > State Sensor/Actuator >
Alarmed/Open/On
•
Trigger condition: Alarmed
•
Action: Activate Load Shedding
Step 2: create the contact closure-triggered load shedding event rule
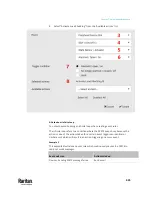
1.
Click
on the Event Rules page.
2.
In this illustration, assign the name "Contact Closure Triggered Load
Shedding" to the new rule.
3.
In the Event field, select "Peripheral Device Slot" to indicate we are
specifying an event related to the environmental sensor package.
4.
Select the ID number of the desired contact closure sensor. In this
illustration, the ID number of the desired contact closure sensor is 1, so
select Slot 1.
Note: ID numbers of all sensors/actuators are available on the Peripherals
page. See
Peripherals
(on page 258).
5.
Select "State Sensor/Actuator" because the contact closure sensor is a
state sensor.
6.
Select "Alarmed" since we want the PX3TS to respond when the selected
contact closure sensor changes its state related to the "alarmed" state.
7.
In the 'Trigger condition' field, select the Alarmed/Open/On radio button
so that the action is taken only when the contact closure sensor enters the
alarmed state.
Содержание Raritan PX3TS
Страница 4: ......
Страница 6: ......
Страница 20: ......
Страница 52: ...Chapter 3 Initial Installation and Configuration 32 Number Device role Master device Slave 1 Slave 2 Slave 3...
Страница 80: ...Chapter 4 Connecting External Equipment Optional 60...
Страница 109: ...Chapter 5 PDU Linking 89...
Страница 117: ...Chapter 5 PDU Linking 97...
Страница 440: ...Chapter 7 Using the Web Interface 420 If wanted you can customize the subject and content of this email in this action...
Страница 441: ...Chapter 7 Using the Web Interface 421...
Страница 464: ...Chapter 7 Using the Web Interface 444...
Страница 465: ...Chapter 7 Using the Web Interface 445 Continued...
Страница 746: ...Appendix A Specifications 726...
Страница 823: ...Appendix I RADIUS Configuration Illustration 803 Note If your PX3TS uses PAP then select PAP...
Страница 824: ...Appendix I RADIUS Configuration Illustration 804 10 Select Standard to the left of the dialog and then click Add...
Страница 825: ...Appendix I RADIUS Configuration Illustration 805 11 Select Filter Id from the list of attributes and click Add...
Страница 828: ...Appendix I RADIUS Configuration Illustration 808 14 The new attribute is added Click OK...
Страница 829: ...Appendix I RADIUS Configuration Illustration 809 15 Click Next to continue...
Страница 860: ...Appendix J Additional PX3TS Information 840...
Страница 890: ...Appendix K Integration 870 3 Click OK...
Страница 900: ......


