


792
This section provides illustrations for configuring RADIUS authentication. One
illustration is based on the Microsoft
®
Network Policy Server (NPS), and the
other is based on a FreeRADIUS server.
The following steps are required for any RADIUS authentication:
1.
Configure RADIUS authentication on the PX3TS. See
Adding Radius Servers
(on page 365).
2.
Configure roles on the PX3TS. See
Creating Roles
(on page 302).
3.
Configure PX3TS user credentials and roles on your RADIUS server.
▪
To configure using standard attributes, see
Standard Attributes
(on
page 792).
▪
To configure using vendor-specific attributes, see
Vendor-Specific
Attributes
(on page 811).
Note that we assume that the NPS is running on a Windows 2008 system in the
NPS illustrations.
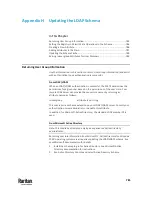
In This Chapter
Standard Attributes .......................................................................................... 792
Vendor-Specific Attributes ............................................................................... 811
AD-Related Configuration ................................................................................. 824
Standard Attributes
The RADIUS standard attribute "Filter-ID" is used to convey the group
membership, that is, roles.
•
If a user has multiple roles, configure multiple standard attributes for this
user.
•
The syntax of a standard attribute is:
Raritan:G{role-name}
For configuration on NPS, see
NPS Standard Attribute Illustration
(on page
792).
For configuration on FreeRADIUS, see
FreeRADIUS Standard Attribute
Illustration
(on page 810).
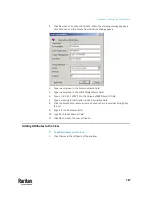
NPS Standard Attribute Illustration
To configure Windows 2008 NPS with the
standard attribute
, you must:
a.
Add your PX3TS to NPS. See
Step A: Add Your PX3TS as a RADIUS Client
(on page 793).
Appendix I
RADIUS Configuration Illustration
Содержание Raritan PX3TS
Страница 4: ......
Страница 6: ......
Страница 20: ......
Страница 52: ...Chapter 3 Initial Installation and Configuration 32 Number Device role Master device Slave 1 Slave 2 Slave 3...
Страница 80: ...Chapter 4 Connecting External Equipment Optional 60...
Страница 109: ...Chapter 5 PDU Linking 89...
Страница 117: ...Chapter 5 PDU Linking 97...
Страница 440: ...Chapter 7 Using the Web Interface 420 If wanted you can customize the subject and content of this email in this action...
Страница 441: ...Chapter 7 Using the Web Interface 421...
Страница 464: ...Chapter 7 Using the Web Interface 444...
Страница 465: ...Chapter 7 Using the Web Interface 445 Continued...
Страница 746: ...Appendix A Specifications 726...
Страница 823: ...Appendix I RADIUS Configuration Illustration 803 Note If your PX3TS uses PAP then select PAP...
Страница 824: ...Appendix I RADIUS Configuration Illustration 804 10 Select Standard to the left of the dialog and then click Add...
Страница 825: ...Appendix I RADIUS Configuration Illustration 805 11 Select Filter Id from the list of attributes and click Add...
Страница 828: ...Appendix I RADIUS Configuration Illustration 808 14 The new attribute is added Click OK...
Страница 829: ...Appendix I RADIUS Configuration Illustration 809 15 Click Next to continue...
Страница 860: ...Appendix J Additional PX3TS Information 840...
Страница 890: ...Appendix K Integration 870 3 Click OK...
Страница 900: ......


