


Chapter 6: Using the PX3TS
113
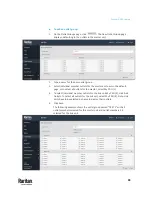
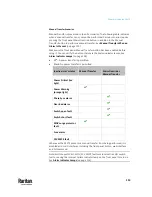
Manual Transfer Scenarios
Manual transfer is prevented in specific scenarios. The following table indicates
when a manual transfer can or cannot be performed. Certain scenarios require
pressing the front panel Alarm Override button in addition to the Manual
Transfer button to perform a manual transfer. See
Manual Transfer When an
Alarm is Present
(on page 114).
Make sure the front panel Manual Transfer button has been enabled before
using it. You can verify the button status via the Alarm indicator lamps. See
Alarm Indicator Lamps
(on page 118).
•
: A power transfer is permitted.
•
Blank: No power transfer is permitted.
Inactive inlet's status
Manual Transfer
Alarm Ov
Manual Transfer
Power Critical (red
light)
Power Warning
(orange light)
Phase Sync alarm
Overload alarm
Switch open fault
Switch short fault
MOV surge protector
fault
Fuse alarm
12V SMPS fault
Whenever the PX3TS prevents a manual transfer from being performed, it is
disabled across all interfaces, including the front panel button, web interface
and CLI command.
Note: Switch open/short, MOV, 12V SMPS faults are internal transfer switch
faults, causing the Internal Failure indicator lamp on the front panel to turn on.
See
Alarm Indicator Lamps
(on page 118).
Содержание Raritan PX3TS
Страница 4: ......
Страница 6: ......
Страница 20: ......
Страница 52: ...Chapter 3 Initial Installation and Configuration 32 Number Device role Master device Slave 1 Slave 2 Slave 3...
Страница 80: ...Chapter 4 Connecting External Equipment Optional 60...
Страница 109: ...Chapter 5 PDU Linking 89...
Страница 117: ...Chapter 5 PDU Linking 97...
Страница 440: ...Chapter 7 Using the Web Interface 420 If wanted you can customize the subject and content of this email in this action...
Страница 441: ...Chapter 7 Using the Web Interface 421...
Страница 464: ...Chapter 7 Using the Web Interface 444...
Страница 465: ...Chapter 7 Using the Web Interface 445 Continued...
Страница 746: ...Appendix A Specifications 726...
Страница 823: ...Appendix I RADIUS Configuration Illustration 803 Note If your PX3TS uses PAP then select PAP...
Страница 824: ...Appendix I RADIUS Configuration Illustration 804 10 Select Standard to the left of the dialog and then click Add...
Страница 825: ...Appendix I RADIUS Configuration Illustration 805 11 Select Filter Id from the list of attributes and click Add...
Страница 828: ...Appendix I RADIUS Configuration Illustration 808 14 The new attribute is added Click OK...
Страница 829: ...Appendix I RADIUS Configuration Illustration 809 15 Click Next to continue...
Страница 860: ...Appendix J Additional PX3TS Information 840...
Страница 890: ...Appendix K Integration 870 3 Click OK...
Страница 900: ......


