


Chapter 7: Using the Web Interface
447
Monitoring Server Accessibility
You can monitor whether specific IT devices are alive by having the PX3TS
continuously ping them. An IT device's successful response to the ping
commands indicates that the IT device is still alive and can be remotely
accessed.
This function is especially useful when you are not located in an area with
Internet connectivity.
PX3TS can monitor any IT device, such as database servers, remote
authentication servers, power distribution units (PDUs), and so on. It supports
monitoring a maximum of 64 IT devices.
To perform this feature, you need the Administrator Privileges.
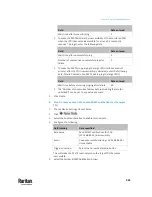
The default ping settings may not be suitable for monitoring devices that
require high connection reliability so it is strongly recommended that you
should adjust the ping settings for optimal results.
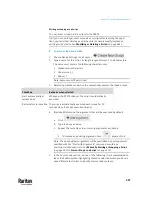
In addition, if your PX3TS is outlet switching capable, you can even connect a
monitored IT device to one or multiple outlets of PX3TS and then have PX3TS
perform the following two actions as needed, in addition to monitoring its
status:
•
First shut down the monitored IT device.
•
After the IT device is shut down, power off the outlet(s) where that device
is connected.
Important: Not every IT device can be shut down by PX3TS so it is suggested
to verify whether the device can be shut down using a shutdown command.
For example, PX3TS cannot shut down a PDU with a shutdown command.
Tip: To make the PX3TS automatically log, send notifications or perform other
actions for any server monitoring events, you can create event rules. See
Event
Rules and Actions
(on page 375). An example is available in
Example: Ping
Monitoring and SNMP Notifications
(on page 452).
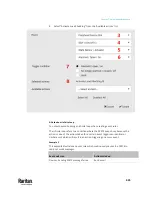
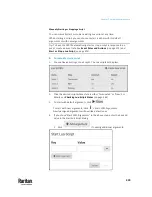
To add IT equipment for ping monitoring:
1.
Choose Device Settings > Server Reachability.
2.
Click
.
3.
By default, the "Enable ping monitoring for this server" checkbox is
selected. If not, select it to enable this feature.
4.
Configure the following.
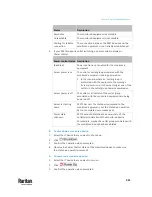
Field
Description
IP address/hostname
IP address or host name of the IT equipment
which you want to monitor.
Содержание Raritan PX3TS
Страница 4: ......
Страница 6: ......
Страница 20: ......
Страница 52: ...Chapter 3 Initial Installation and Configuration 32 Number Device role Master device Slave 1 Slave 2 Slave 3...
Страница 80: ...Chapter 4 Connecting External Equipment Optional 60...
Страница 109: ...Chapter 5 PDU Linking 89...
Страница 117: ...Chapter 5 PDU Linking 97...
Страница 440: ...Chapter 7 Using the Web Interface 420 If wanted you can customize the subject and content of this email in this action...
Страница 441: ...Chapter 7 Using the Web Interface 421...
Страница 464: ...Chapter 7 Using the Web Interface 444...
Страница 465: ...Chapter 7 Using the Web Interface 445 Continued...
Страница 746: ...Appendix A Specifications 726...
Страница 823: ...Appendix I RADIUS Configuration Illustration 803 Note If your PX3TS uses PAP then select PAP...
Страница 824: ...Appendix I RADIUS Configuration Illustration 804 10 Select Standard to the left of the dialog and then click Add...
Страница 825: ...Appendix I RADIUS Configuration Illustration 805 11 Select Filter Id from the list of attributes and click Add...
Страница 828: ...Appendix I RADIUS Configuration Illustration 808 14 The new attribute is added Click OK...
Страница 829: ...Appendix I RADIUS Configuration Illustration 809 15 Click Next to continue...
Страница 860: ...Appendix J Additional PX3TS Information 840...
Страница 890: ...Appendix K Integration 870 3 Click OK...
Страница 900: ......


