Basic Programming for the NT Voice Mail
Step 9: Modify the Dial Action Tables
34
NT System Guide
Chapter 1: Installation
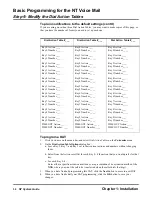
To plan modifications to the default settings (cont’d)
If you are using more than three Dial Action Tables, you may want to make copies of this page, so
that you have the number of forms you need to set up each one.
To program a DAT:
1.
Click Customize on the menu bar, and select Dial Action Tables on the Customize menu.
2.
On the Dial Action Table Options dialog box:
a. Leave Key 9, Key *, and Key # set to their current actions and numbers without changing
them.
b. Select from the Action scroll list for each Key 0
–
8 the action that you would prefer for that
key.
c. For each Key 0
–
8:
Enter either a specific extension/mailbox or a representation of an extension/mailbox, like
XXX, where you want the call to be transferred when the caller dials that digit.
3.
When you have finished programming this DAT, click the Next button to move to next DAT.
4.
When you have finished all your DAT programming, click the OK button to save your
changes.
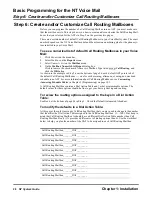
Dial Action Table #___
Dial Action Table #___
Dial Action Table #___
Key 0 Action ____
Key 0 Number ____
Key 1 Action ____
Key 1 Number ____
Key 2 Action ____
Key 2 Number ____
Key 3 Action ____
Key 3 Number ____
Key 4 Action ____
Key 4 Number ____
Key 5 Action ____
Key 5 Number ____
Key 6 Action ____
Key 6 Number ____
Key 7 Action ____
Key 7 Number ____
Key 8 Action ____
Key 8 Number ____
Key 9 Action ____
Key 9 Number ____
TIMEOUT Action ____
TIMEOUT Number ____
Summary of Contents for NVM-NT
Page 28: ...Table of Contents Chapter 5 Maintenance xxvi NT System Guide ...
Page 130: ...Installing SMDI 102 NT System Guide Chapter 3 Programming ...
Page 146: ...Customizing Caller I D Tables General Tab 118 NT System Guide Chapter 3 Programming ...
Page 156: ...Customizing Callout Options Optional Tab 128 NT System Guide Chapter 3 Programming ...
Page 182: ...Customizing Distribution Lists General Tab 154 NT System Guide Chapter 3 Programming ...
Page 338: ...Customizing Port Options General Tab 310 NT System Guide Chapter 3 Programming ...
Page 358: ...Customizing System Options Timers Tab 330 NT System Guide Chapter 3 Programming ...
Page 362: ...Customizing System Options Timers Tab 334 NT System Guide Chapter 3 Programming ...
Page 367: ...Customizing Tenant Options General Tab Chapter 3 Programming NT System Guide 339 ...
Page 396: ...Viewing and Printing Reports System Options Report 368 NT System Guide Chapter 3 Programming ...
Page 400: ...Performing a Local Backup Backup Dialog Box 372 NT System Guide Chapter 3 Programming ...
Page 440: ...Using Port Activities 412 NT System Guide Chapter 3 Programming ...
Page 454: ...Using Message Status Message Status Dialog Box 426 NT System Guide Chapter 3 Programming ...


