Installing the NT Voice Mail
Step 6: Install a Phone System in the NT Voice Mail System
Chapter 1: Installation
NT System Guide
17
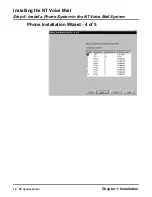
The Phone Installation Wizard - 4 of 5 dialog box displays the Extension Range Table. You can
use this table to help you create a range of numbers for certain mailbox types in your Voice Mail
system. When this dialog box is first displayed on your screen, it shows the default number of
extensions/mailboxes and the starting extension for the Subscriber Mailboxes and Trunk Mailboxes
installed with your phone system. It also shows mailboxes that are undefined (not assigned with a
mailbox type. You can change the defaults by using this table.
(For a complete list of mailbox types and a description of each type, see the Customizing Mail-
boxes section later in this guide.)
Creating Subscriber Mailboxes
It is recommended that you use the table to create a Subscriber Mailbox for each extension that is
currently in your phone system. Although the system supports variable length for extensions or
mailboxes, it is recommended that you keep all of your mailbox numbers the same length if possi-
ble. And if you want to create a 3-digit mailbox number that has a leading digit of 4, all mailbox
numbers with the leading digit of 4 must have three digits. For example, if you are creating Sub-
scriber Mailbox 432, the only mailbox numbers that you can have with the leading digit of 4 will be
400
–
499, rather than 40
–
49 or 4000
–
4999.
Creating Trunk Mailboxes
You will need trunk mailboxes in your Voice Mail system only if your phone system sends Trunk
I.D. to the Voice Mail as part of the integration protocol and if you would like each line to answer
with a special Welcome Message. (For more information about Trunk Mailboxes, see the Customiz-
ing Mailboxes section, starting on page page 299. For more information about setting up Welcome
Messages, see Welcome Message on page 109 of the Customizing Answering Schedule Tables sec-
tion.)
Later you will be able to customize your mailbox setup by adding mailboxes that you did not even
consider creating here, editing the properties of existing mailboxes, and deleting those mailboxes
that are no longer needed. (For instructions, see the Customizing Mailboxes section later in this
guide.)
When you are done using this table:
Click the
button to reach the Phone Installation Wizard - 5 of 5 dialog box shown
on the next page.
Summary of Contents for NVM-NT
Page 28: ...Table of Contents Chapter 5 Maintenance xxvi NT System Guide ...
Page 130: ...Installing SMDI 102 NT System Guide Chapter 3 Programming ...
Page 146: ...Customizing Caller I D Tables General Tab 118 NT System Guide Chapter 3 Programming ...
Page 156: ...Customizing Callout Options Optional Tab 128 NT System Guide Chapter 3 Programming ...
Page 182: ...Customizing Distribution Lists General Tab 154 NT System Guide Chapter 3 Programming ...
Page 338: ...Customizing Port Options General Tab 310 NT System Guide Chapter 3 Programming ...
Page 358: ...Customizing System Options Timers Tab 330 NT System Guide Chapter 3 Programming ...
Page 362: ...Customizing System Options Timers Tab 334 NT System Guide Chapter 3 Programming ...
Page 367: ...Customizing Tenant Options General Tab Chapter 3 Programming NT System Guide 339 ...
Page 396: ...Viewing and Printing Reports System Options Report 368 NT System Guide Chapter 3 Programming ...
Page 400: ...Performing a Local Backup Backup Dialog Box 372 NT System Guide Chapter 3 Programming ...
Page 440: ...Using Port Activities 412 NT System Guide Chapter 3 Programming ...
Page 454: ...Using Message Status Message Status Dialog Box 426 NT System Guide Chapter 3 Programming ...


