Chapter 1: Installation and Initial Configuration
8
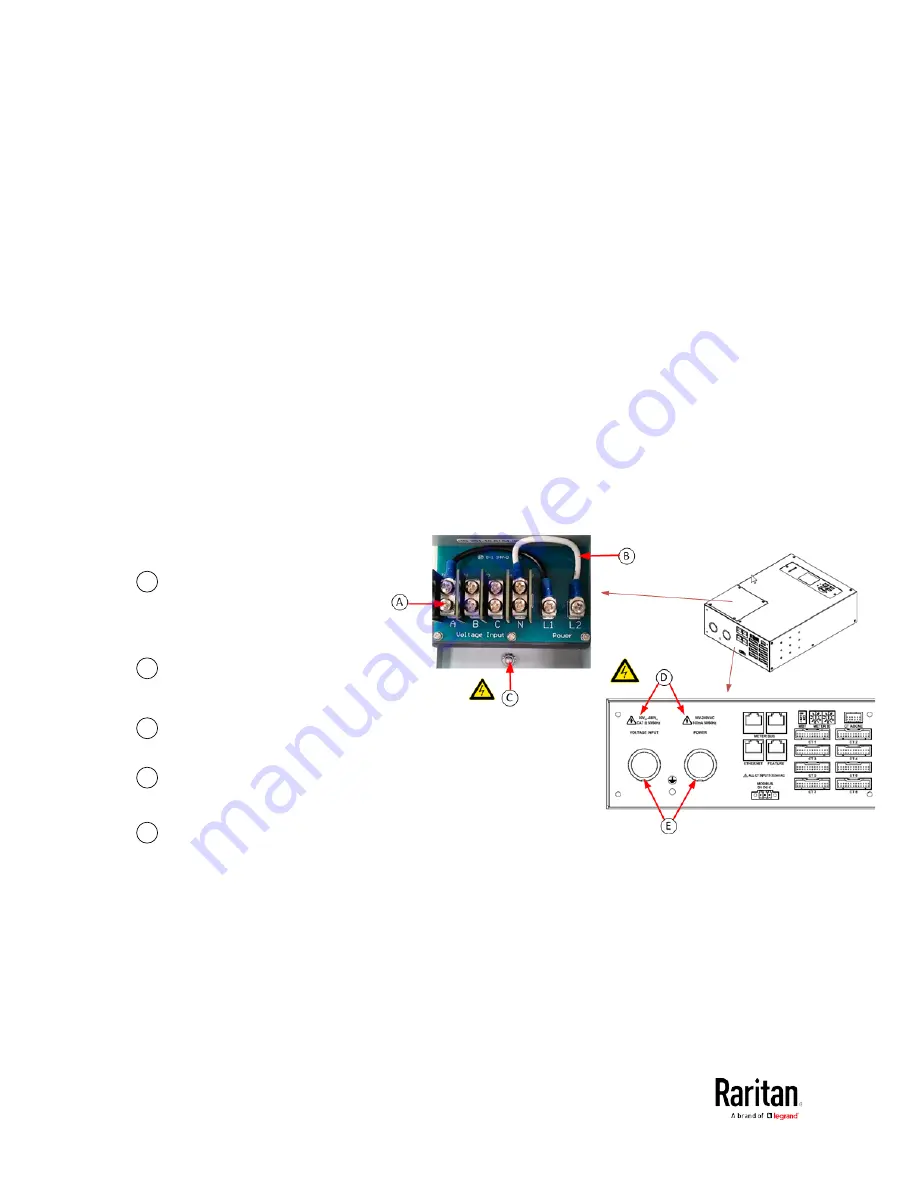
Voltage Measurement and Power Wiring
BCM2-96xx series products are available with factory installed line cords
(PLUGGABLE EQUIPMENT) or conduit knockouts and field wiring
terminals (PERMANENTLY CONNECTED EQUIPMENT).
This section describes how to wire models with conduit knockouts and
field wiring terminals. Models with factory installed line cords are not
end user wired and must not be opened or modified.
There are two conduit knockouts on the rear panel – one for voltage
inputs (voltages that are measured), the other for power (power to run
the product). In most cases, only voltage inputs are wired because power
can be derived from the voltage inputs (see jumpers in figure).
Product power is taken from the voltage inputs using two jumpers. A
separate circuit can be used for power which insures BCM2 continues to
operate when voltages inputs fail. A separate power circuit MUST be
used if the voltage inputs exceed power rating (90-240VAC). When using
a separate circuit, remove factory jumpers and wire circuit to the power
L1 and L2 terminals.
A
Terminals accept 14-18
AWG solid or stranded wire.
Use ring terminals on
stranded wire. Use wire
rated 75°C or higher.
B
Jumpers power unit from
voltage inputs. Move or
remove as necessary.
C
Connect ground wires to
stud.
D
Verify circuit voltages
match product ratings.
E
½ and ¾ conduit fitting
knockouts
Содержание PMC-1000
Страница 3: ...BCM2 Series Power Meter Xerus Firmware v3 4 0 User Guide...
Страница 23: ...Chapter 1 Installation and Initial Configuration 11 Panel Wiring Example...
Страница 54: ...Chapter 1 Installation and Initial Configuration 42 Branch Circuit Details...
Страница 76: ...Chapter 2 Connecting External Equipment Optional 64...
Страница 123: ...Chapter 3 Using the Web Interface 111...
Страница 558: ...Appendix D RADIUS Configuration Illustration 546 Note If your BCM2 uses PAP then select PAP...
Страница 559: ...Appendix D RADIUS Configuration Illustration 547 10 Select Standard to the left of the dialog and then click Add...
Страница 560: ...Appendix D RADIUS Configuration Illustration 548 11 Select Filter Id from the list of attributes and click Add...
Страница 563: ...Appendix D RADIUS Configuration Illustration 551 14 The new attribute is added Click OK...
Страница 564: ...Appendix D RADIUS Configuration Illustration 552 15 Click Next to continue...
Страница 594: ...Appendix E Additional BCM2 Information 582...
Страница 612: ......


