Chapter 3: Using the Web Interface
100
6
State indicates if readings are normal, warning or
critical.
7
Click actions menu for more options.
Power Meter Management
This section introduces the operations for a power meter module. For
information on the power meter's sensor data, see
Viewing the Power
Meter Data
(on page 99).
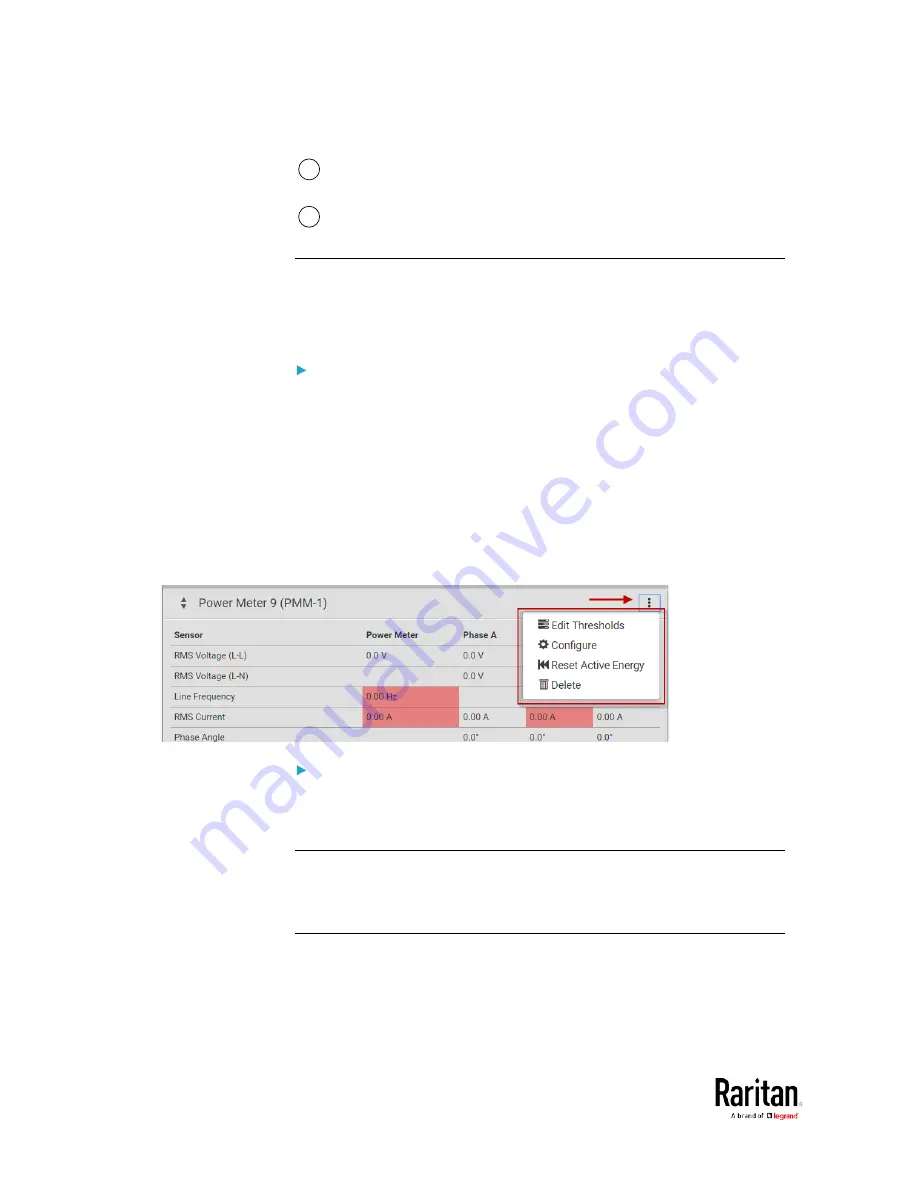
To access power meter management options:
•
Click Power Meters in the menu, then select a power meter. In the
power meter details page, click the actions icon in the top right
corner.
The following options are available:
•
Edit Thresholds: See
Configure Thresholds
(on page 106).
•
Configure: You can edit some details of the power meter
configuration. See
Configure Power Meter
(on page 31).
•
Reset Active Energy: See below.
•
Delete: Click Delete to delete this power meter.
To reset active energy:
Click Reset Active energy to reset the power meter's active energy to 0
(zero) Wh. Only users with the "Change PMC, PMB & PMM
Configuration" permission can reset active energy readings.
Tip: To reset all active energy readings simultaneously, see Resetting All
Active Energy. To reset a branch circuit's active energy, see
Panel
Branch Circuits Operations
(on page 105). To reset a panel's active
energy, see
Panel Mains Circuit Management
(on page 104).
Содержание PMC-1000
Страница 3: ...BCM2 Series Power Meter Xerus Firmware v3 4 0 User Guide...
Страница 23: ...Chapter 1 Installation and Initial Configuration 11 Panel Wiring Example...
Страница 54: ...Chapter 1 Installation and Initial Configuration 42 Branch Circuit Details...
Страница 76: ...Chapter 2 Connecting External Equipment Optional 64...
Страница 123: ...Chapter 3 Using the Web Interface 111...
Страница 558: ...Appendix D RADIUS Configuration Illustration 546 Note If your BCM2 uses PAP then select PAP...
Страница 559: ...Appendix D RADIUS Configuration Illustration 547 10 Select Standard to the left of the dialog and then click Add...
Страница 560: ...Appendix D RADIUS Configuration Illustration 548 11 Select Filter Id from the list of attributes and click Add...
Страница 563: ...Appendix D RADIUS Configuration Illustration 551 14 The new attribute is added Click OK...
Страница 564: ...Appendix D RADIUS Configuration Illustration 552 15 Click Next to continue...
Страница 594: ...Appendix E Additional BCM2 Information 582...
Страница 612: ......


