Chapter 3: Using the Web Interface
137
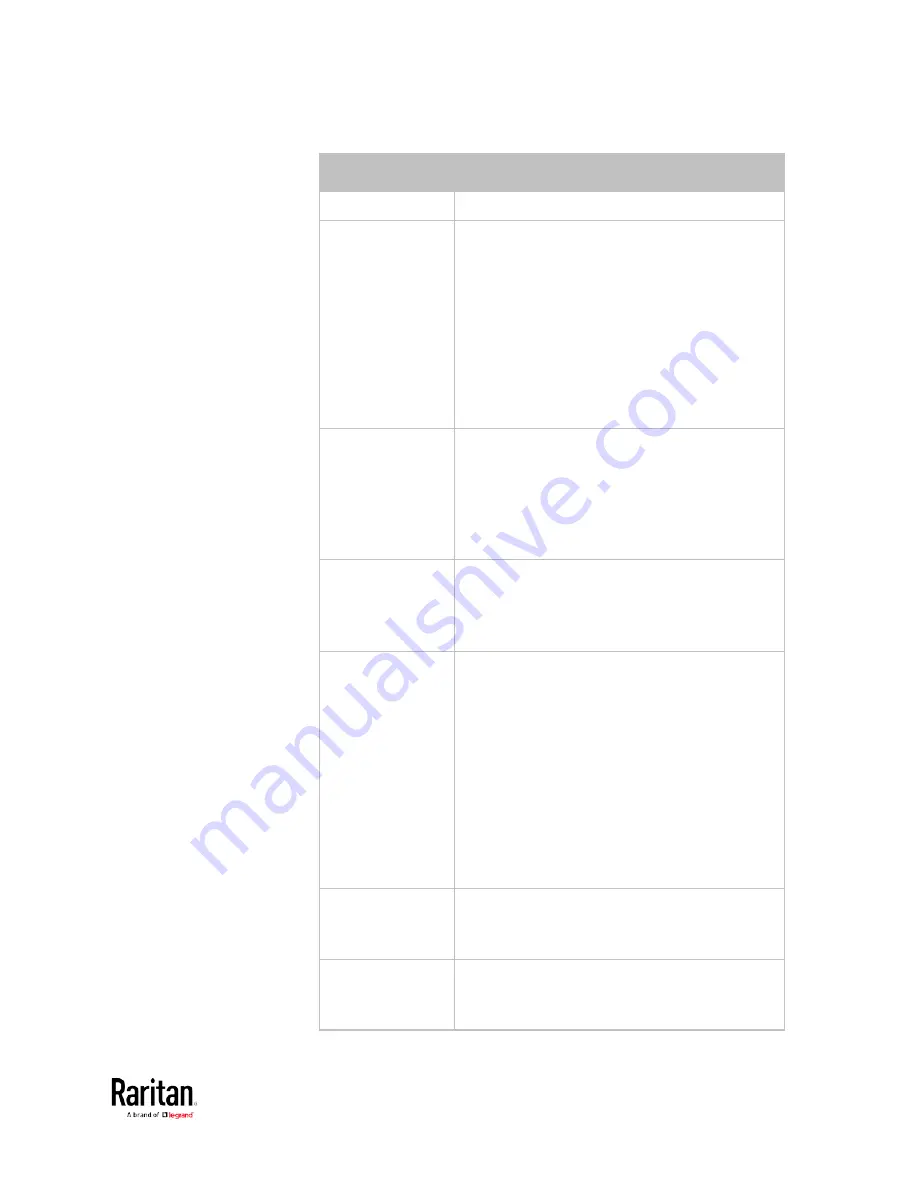
Field
Description
Name
Name for this asset strip assembly.
Number of Rack
Units
Total of available tag ports on this asset strip
assembly, ranging between 8 and 64.
For the current generation of asset strips,
which show the suffix "G3" on its hardware
label, the BCM2 automatically detects the
number of its tag ports (rack units), and you
cannot change this value.
For old "non-G3" asset strips, there is no
automatic detection for them so you must
manually adjust this value.
Numbering Mode The rack unit numbering method in a
rack/cabinet.
Top-Down: The numbering starts from the
highest rack unit of a rack/cabinet.
Bottom-Up: The numbering starts from the
lowest rack unit of a rack/cabinet.
Numbering Offset The start number in the rack unit numbering.
For example, if this value is set to 3, then the
first number is 3, the second number is 4, and
so on.
Orientation
The asset strip's orientation by indicating the
location of its RJ-45 connector.
Top Connector: The RJ-45 connector is
located on the top.
Bottom Connector: The RJ-45 connector is
located on the bottom.
Asset strips can detect their strip orientation
and show it in this field.
You need to adjust this value only when your
asset strips are the oldest ones without tilt
sensors implemented.
Color with
connected tag
Click this field to determine the LED color
denoting the presence of an asset tag.
Default is green.
Color without
connected tag
Click this field to determine the LED color
denoting the absence of an asset tag.
Default is red.
Содержание PMC-1000
Страница 3: ...BCM2 Series Power Meter Xerus Firmware v3 4 0 User Guide...
Страница 23: ...Chapter 1 Installation and Initial Configuration 11 Panel Wiring Example...
Страница 54: ...Chapter 1 Installation and Initial Configuration 42 Branch Circuit Details...
Страница 76: ...Chapter 2 Connecting External Equipment Optional 64...
Страница 123: ...Chapter 3 Using the Web Interface 111...
Страница 558: ...Appendix D RADIUS Configuration Illustration 546 Note If your BCM2 uses PAP then select PAP...
Страница 559: ...Appendix D RADIUS Configuration Illustration 547 10 Select Standard to the left of the dialog and then click Add...
Страница 560: ...Appendix D RADIUS Configuration Illustration 548 11 Select Filter Id from the list of attributes and click Add...
Страница 563: ...Appendix D RADIUS Configuration Illustration 551 14 The new attribute is added Click OK...
Страница 564: ...Appendix D RADIUS Configuration Illustration 552 15 Click Next to continue...
Страница 594: ...Appendix E Additional BCM2 Information 582...
Страница 612: ......


