4.
Click
Next
.
5.
Optional: Select an expansion unit from the
Enclosure Unit
list.
Important
• You cannot select disks from multiple expansion units.
• If the expansion unit is disconnected from the NAS, the storage pool becomes inaccessible
until it is reconnected.
6.
Select
Create SED secure static volume
.
The list of disks only displays SED disks.
7.
Select one or more disks.
8.
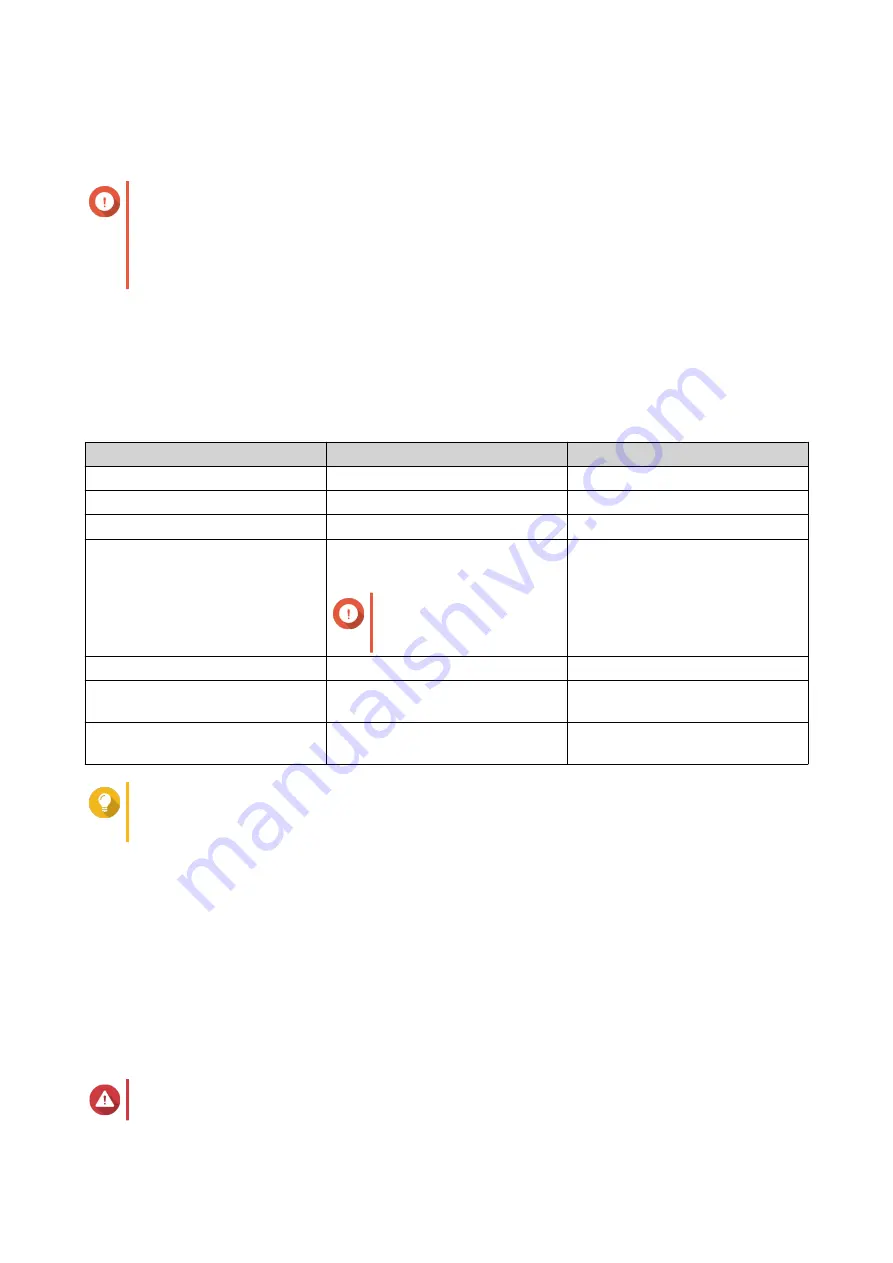
Select a RAID type.
QTS displays all available RAID types and automatically selects the most optimized RAID type.
Number of disks
Supported RAID Types
Default RAID Type
One
Single
Single
Two
JBOD, RAID 0, RAID 1
RAID 1
Three
JBOD, RAID 0, RAID 5
RAID 5
Four
JBOD, RAID 0, RAID 5, RAID 6,
RAID 10
Important
RAID 10 requires an even
number of disks.
RAID 5
Five
JBOD, RAID 0, RAID 5, RAID 6
RAID 6
Six or more
JBOD, RAID 0, RAID 5, RAID 6,
RAID 10, RAID 50
RAID 6
Eight or more
JBOD, RAID 0, RAID 5, RAID 6,
RAID 10, RAID 50, RAID 60
RAID 6
Tip
Use the default RAID type if you are unsure of which option to choose.
For details, see
.
9.
Optional: Select the disk that will be used as a hot spare for this RAID group.
The designated hot spare automatically replaces any disk in the RAID group that fails.
For details, see
10.
Optional: Select the number of RAID 50 or RAID 60 subgroups.
The selected disks are divided evenly into the specified number of RAID 5 or 6 groups.
• A higher number of subgroups results in faster RAID rebuilding, increased disk failure tolerance,
and better performance if all the disks are SSDs.
• A lower number of subgroups results in more storage capacity, and better performance if all the
disks are HDDs.
Warning
QTS 4.5.x User Guide
Storage & Snapshots
214


