Defining Phone System Signals
Running AccuCall–Call Analysis for Rhetorex
Octel 50 Installation Guide
9-9
18. In the Type field, use the <SPACEBAR> to select a classification. Assign a BUSY
type since you are currently testing the busy signal.
19. In the Terminating field, use the <SPACEBAR> to select Yes if the tone is used to
indicate a disconnect.
In most cases, you do not need to specify the busy or ring signals you are analyzing
as Terminating. A terminating tone is a tone from the switch that indicates a
disconnect. Some tones need to be identified as Terminating during playback or
record operations if the call is to terminate when the tone is detected. For example,
you may need to designate a fast busy as Terminating on some switches. Note that if
you do identify a tone as Terminating, at least one frequency must be detected in the
Auto Run <F6> test. This frequency must be in one of the first three positions in the
<F3> Filter Table.
20. In the Cadence field, use the <SPACEBAR> to select Yes if the word None appears
in both frequency fields. If the frequencies of a tone are unknown, call progress
monitoring analyzes the cadence without frequency analysis.
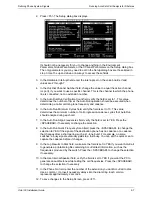
21. In the FREQUENCY1 and FREQUENCY2 fields, verify that there is a minimum 40 Hz
spread between the detected frequencies. (If one of the frequencies is None, this is
not necessary.) If there is not at least a 40 Hz spread, adjust the FREQUENCY1 and
FREQUENCY2 settings on the screen as little as possible to achieve the spread. If
the two tones in question are within 10 Hz of each other, change the lower frequency
value of the two to equal the higher frequency value.
22. In the PCPMCODE field, enter a numeric identifier to the tone. Specify identifier 7 for
all busy tones. If the tone is undefined, the device driver returns PCPMCODE 9; if an
answer is detected, the driver returns PCPMCODE 10.
If an incorrect PCPMCODE is returned, AccuCall is not differentiating between the
tones. See the topic, “Common AccuCall Problems/Solutions,” later in this chapter for
information on how to help AccuCall differentiate between tones.
23. To add the tone to the tone table and save it, press <F8> twice. If a tone with the
name you entered in step 17 already exists, you are prompted to press <F7> to
replace the existing tone. Press <F7> if you want to replace the existing tone with the
new tone. If you do not want to replace the existing tone, press <Esc>, enter a new
name for the tone, then press <F8> twice again.
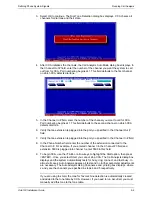
24. To advance to the Auto Run dialog box to analyze the ring tone, press <F6>.
25. To test ring, make sure the receiver of the extension you are using is on hook.
26. To start AccuCall analysis, press <F9>.
27. When prompted to add tones, press <F8>. The Edit Tones dialog box displays.
28. In the Name field, enter a name for the tone. The name should be descriptive such as
the name of the switch followed by the Ring. Once you name the tone, it appears on
the Main Menu dialog box. If you need to edit the tone later, select it from the Main
Menu dialog box by highlighting it and pressing <ENTER>.
29. In the Type field, use the <SPACEBAR> to select a classification. Assign a RING type
since you are currently testing the ring signal.
30. In the Terminating field, use the <SPACEBAR> to select Yes if the tone is used to
indicate a disconnect.
Содержание Octel 50
Страница 2: ......
Страница 3: ...Octel 50 Installation Guide 585 313 134 Comcode 108503004 101 1840 000 Issue 1 June 1999 ...
Страница 8: ......
Страница 22: ...Determining System Needs Step 3 Consider Additional Hardware Needs OCTEL 50 INSTALLATION GUIDE 2 6 Notes ...
Страница 36: ...Installing the Hardware Step 10 Installing the Sentinel Octel 50 Installation Guide 3 14 Notes ...
Страница 52: ...Running the SMDI Utility Running SMDI as a Standalone Utility Octel 50 Installation Guide 5 4 Notes ...
Страница 180: ...Integrating with an Uninterruptible Power Supply Running UPS Integration Octel 50 Installation Guide 10 4 Notes ...


