12-17-15
Chapter 12
Inverter Functions
Switching to the Commercial Operation (Bypass
Mode)
• When the [PA-04] bypass function selection is set
to 01: Enabled, switching to the commercial
operation mode (bypass mode) is allowed if the
specified operation mode is not entered during the
forced operation.
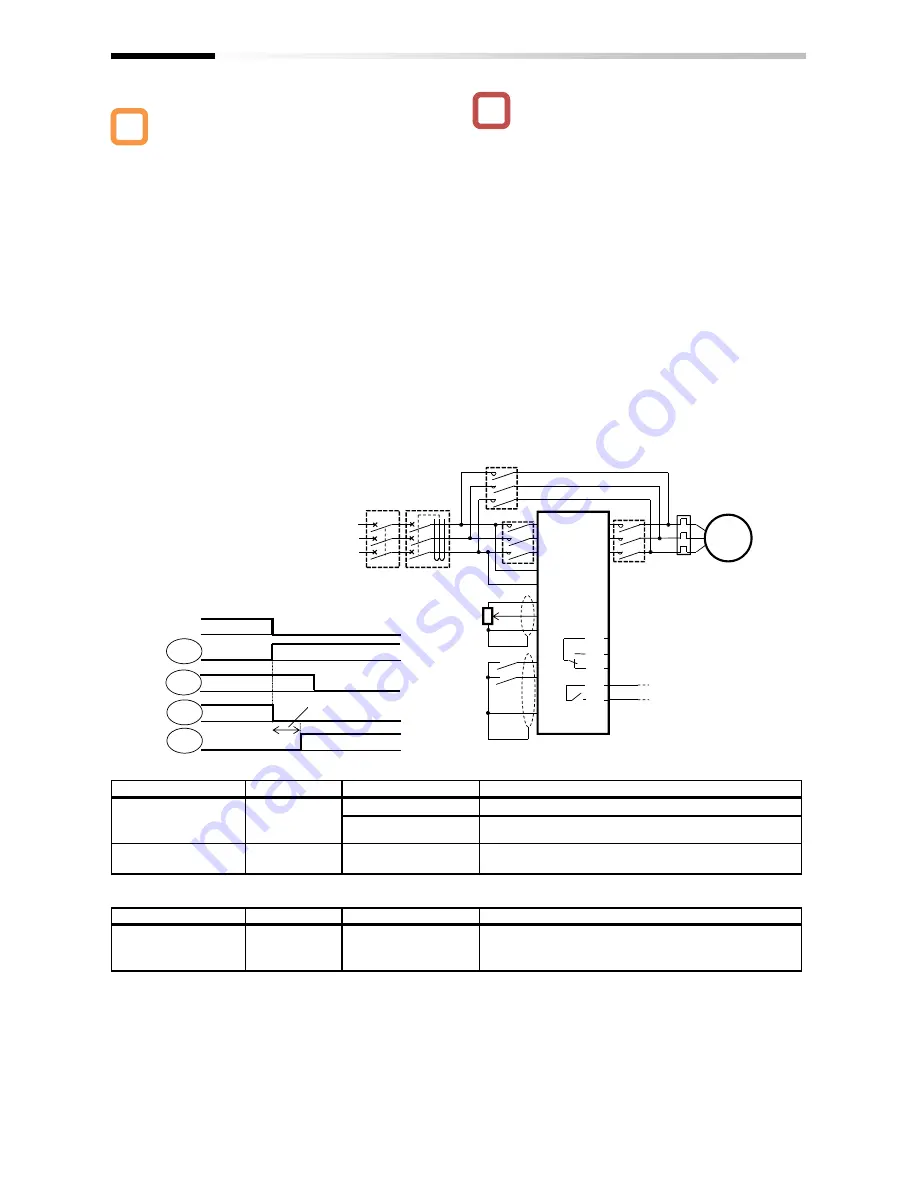
• In the bypass mode, [EMBP] bypass mode signal
(output terminal: 076) is turned on and the inverter
output is shut off.
• For the behavior in the bypass mode, refer to the
following sample connection diagram for the
commercial switching operation and timing.
• Perform the contactor control based on the [EMBP]
bypass mode signal (output terminal: 076).
Example of timing from INV to the commercial
operation
Parameter Setting
Output Terminal Setting
• For using the bypass mode, it is necessary to
implement a interlock taking into consideration the
operation delay of the contactor when shifting to
the commercial operation. •Make sure that the
system operation is safe in using the mode.
• The timing of the contactor control can be taken
using the [EMBP] bypass mode signal (output
terminal: 076) as the contactor control signal. Take
a interlock between the contactor on the
commercial power supply side and that on the
inverter output side.
• Since the commercial circuit does not operate
either when the earth leakage circuit breaker
(ELCB) trips, connect the commercial circuit of
another system to MC2 if the backup is required.
Item
Parameter
Data
Description
Commercial power
supply bypass
function selection
[PA-04]
00
Disabled
01
Enabled
Bypass function
delay time
[PA-05]
0.0~1000.0(s)
Set the delay time until the bypass mode operation.
Item
Parameter
Data
Description
Selecting the output
terminal
[CC-01]~
[CC-07]
076
[EMBP] bypass mode signal.
OFF: Disabled
ON: In the bypass mode
A
!
M
R
S
T
U
V
W
Ai1(10V)
L
FW
RV
COM
AL1
AL0
AL2
THR
MC1
MC3
ELCB
FW
RV
MC2
H
R0
T0
Sample connection diagram when shifting to the commercial operation and timing
NFB
16a
16c
EMBP
To the contactor control
circuit
ON
Operation
MC3
Inverter output
ON
Interlock time for MC2 and MC3
(0.5 to 1 s)
MC2
ON
EMBP
ON
MC1
Summary of Contents for SJ Series
Page 39: ...5 4 Chapter 5 Included Items Memo ...
Page 55: ...6 16 Chapter 6 Installation Memo ...
Page 91: ...7 36 Chapter 7 Wire Connection and Optional Devices Memo ...
Page 135: ...9 40 Chapter 9 Operating Instructions Memo ...
Page 145: ...10 10 Chapter 10 Test Run Memo ...
Page 159: ...12 2 6 Chapter 12 Inverter Functions Memo ...
Page 169: ...12 3 10 Chapter 12 Inverter Functions Memo ...
Page 195: ...12 5 8 Chapter 12 Inverter Functions Memo ...
Page 217: ...12 8 12 Chapter 12 Inverter Function Memo ...
Page 287: ...12 10 32 Chapter 12 Inverter Functions Memo ...
Page 303: ...12 11 16 Chapter 12 Inverter Functions Memo ...
Page 349: ...12 15 8 Chapter 12 Inverter Function Memo ...
Page 395: ...12 17 34 Chapter 12 Inverter Functions Memo ...
Page 397: ...12 18 2 Chapter 12 Inverter Functions Memo ...
Page 415: ...12 19 18 Chapter 12 Inverter Function Memo ...
Page 581: ...15 10 Chapter 15 Optional Cassettes Memo ...
Page 591: ...16 10 Chapter 16 ProDriveNext EzSQ Memo ...
Page 642: ...18 49 Chapter 18 Tips FAQ Troubleshooting Memo ...
Page 650: ...19 8 Chapter 19 Maintenance and Inspection Memo ...
Page 781: ...Appendix 1 70 Appendix 1 List of Parameters Memo ...


