Installing the Stratum 3 Clock
Task List: Install the Stratum 3 clock
SI Installation and Upgrades
693
June 2004
Installing the Stratum 3 Clock
Use this task list to install a Stratum 3 clock.
Task List: Install the Stratum 3 clock
1
Unpack and Inspect Stratum 3 Clock Cabinet
on page 693
2
Install and Position Stratum 3 Clock Cabinet
on page 693
3
Connect AC Power to Stratum 3 Clock Cabinet
on page 694
4
Check and Connect Commercial AC Power
on page 694
5
Connect DC Power and Ground to Stratum 3 Clock Cabinet
on page 694
6
Connect Clock Cabinet Grounding
on page 694
7
Connect Stratum 3 Clock DC Power
on page 695
8
Set the Clock Options
on page 695
9
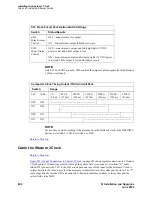
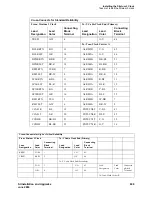
Cable the Stratum 3 Clock
on page 696
10
Install the Stratum 3 Clock Wiring
on page 698
Unpack and Inspect Stratum 3 Clock Cabinet
Return to Task List
1
Check the status of the SHOCKWATCH and/or TILTWATCH indicators on the cardboard
container. If the container has been jarred or tilted beyond specifications, the indicators are red,
indicating possible damage.
2
Remove all packing material.
3
Remove front door and rear screw-on panels from the cabinet.
4
Inspect the cabinet for damage. Report any damage per local instructions.
Install and Position Stratum 3 Clock Cabinet
Return to Task List
Check the location of the AC power receptacle. The receptacle must be on a separately fused circuit that
is not controlled by a wall switch. It must be located within 10 ft (3 m) of the cabinet and should be
located outside the MDF area.
1
Position the clock cabinet in the designated location.
2
If earthquake protection is required, skip to
Install Earthquake Protection for SCC
or
Install
Earthquake Protection for MCC
.
3
If earthquake protection is not required, level the cabinets and adjust and lock the cabinet
stabilizing bolts to keep the cabinet from moving.


