


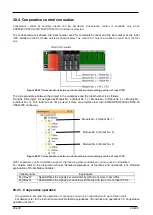


20-501
20-501
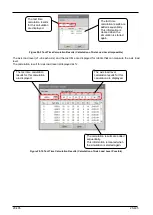
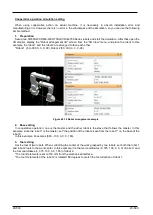
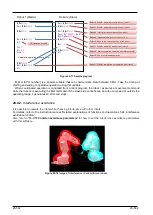
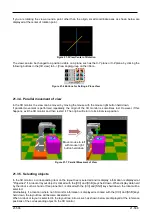
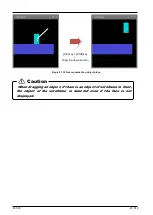
Figure 20-15 Example of controlling the center of the work
Figure 20-16 Example of controlling the center of the work (Detail image)
The control point need not be the center of the workpiece. When moving a long work with two robots, it may be
easier to teach if there is a control point at the tip of the work. For example, in the above example, the control
points of robots 1 and 2 are (0,
375 -> 750
, 100, 0, 0, 0), (0,
375 -> 0
, 100, 0, 0, 180) respectively.
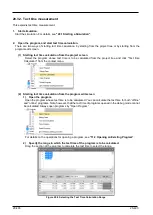
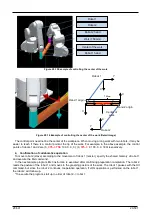
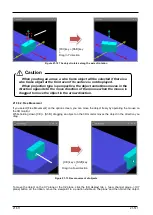
4. Confirmation of collaborative operation
To move robot 2 (slave) according to the movement of robot 1 (master), specify the shared memory of robot 1
and execute the Mxt command.
In the next sample program, Mxt instruction is executed after confirming preparation completion. The robot 2
reads the posture of the robot 1 and moves to the grasping posture of the work. The robot 1 pauses with the Hlt
command, but since the robot 2 continues cooperative operation, if JOG operation is performed on the robot 1,
the robot 2 will follow up.
*To execute the program, start up in order of robot 2 -> robot 1.
Robot 1
Robot 2
Hand 1 origin
Hand 2 origin
X
Y
Y
X
X
X
Y
Y
Center of
work
750mm
Robot 1
Robot 2 hand
Robot 2
Work (750mm)
Center of the work
Robot 1 hand
Summary of Contents for 3F-14C-WINE
Page 84: ...8 84 8 84 Figure 8 21 Parameter transfer procedure 1 2 2 ...
Page 393: ...18 393 18 393 Figure 18 1 Starting the Oscillograph ...
Page 413: ...18 413 18 413 Figure 18 24 Output to Robot program Selection ...
Page 464: ...18 464 18 464 Figure 18 72 Starting the Tool automatic calculation ...
Page 545: ...21 545 21 545 Figure 21 55 Hide display of user mechanism ...
Page 624: ...24 624 24 624 Figure 24 4 Document output example ...