Round the total input power value and the total VA rating up to the next multiple
of 50, producing the following values to be used to select a suitable power
source:
Total continuous input power requirement of
250 Watts and 350 Volt–Amps
Isolation
For installation sites that experience power line transients from lightning or
Transformer
power switching, the use of an isolation transformer is recommended. A
dedicated isolation transformer must be rated at 1KVA or greater.
Uninterruptable
If an uninterruptable power supply (UPS) is used, a UPS rated up to 1KW
Power Supply
(l400VA) is required, depending on the configuration of the VP 300.
(UPS)
–48 VDC Power
Installing the VP 300 with a –48 VDC Power Supply Unit
Supply Unit
The –48 VDC powered cabinet does not include a power cord. A terminal block
is provided on the back of the system for field wiring to the DC power source.
For this reason, Toshiba recommends having the –48 VDC powered system
installed by a qualified electrician familiar with the National Electrical Code
(NEC), which specifies regulations for this type of installation
☞
Use three-conductor, 10-gauge cable when field wiring the –48
VDC powered VP 300. Follow NEC regulations when selecting
suitable wiring material.
Following are the steps for installation:
1.
Locate the VP 300 near the –48 VDC power source.
2.
Turn OFF the power to the DC power source outlet where the VP 300 will
be connected.
3.
Open the front door of the cabinet and verify that the power switch on the
Power Supply Unit (PSU) is in the OFF position.
4.
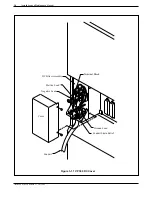
Remove the terminal block cover on the back of the cabinet (Figure 3-1.1).
5.
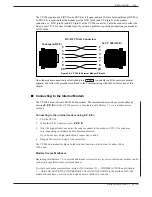
Connect the VP 300 to the power source. Connect the positive pole of the
power source to the terminal block position marked “+” and the negative
pole to the position marked “–” (refer to Figure 3-2).
6.
Connect the earth ground conductor from a suitable building ground to the
ground stud next to the terminal block on the cabinet (refer to Figure 3-2).
7.
Secure the terminal block cover to the cabinet (Figure 3-1.1).
8.
Turn ON the power switch on the PSU in the cabinet, and verify proper
operation as discussed in the VP 300 Testing section in this chapter.
Toshiba VP Systems Release 7.1 July, 1994
INSTALLATION
3-7
Summary of Contents for VP 300
Page 2: ......
Page 10: ......
Page 14: ......
Page 20: ...Toshiba VP Systems Release 7 1 July 1994 ...
Page 52: ...Toshiba VP Systems Release 6 1 February 1993 2 14 Installation and Maintenance Manual ...
Page 56: ...Toshiba VP Systems Release 7 1 July 1994 ...
Page 146: ......
Page 312: ...Toshiba VP Systems Release 7 1 July 1994 ...
Page 314: ......
Page 444: ......
Page 496: ......
Page 542: ......
Page 598: ...Toshiba VP Systems Release 6 1 February 1993 ...
Page 600: ...Toshiba VP Systems Release 6 1 February 1993 ...


