2.
Put on antistatic wrist strap.
3.
Switch OFF the power supply unit. See the Power Supply Unit (PSU)
section in this chapter for details about turning OFF the power to the cabinet.
4.
Using a flat-blade screwdriver, unscrew the two fasteners on the front of
each of the disk drive assemblies in the shelf where the fault DDB is
installed. Disengage each disk drive assembly from the DDB; the disk drive
assembly should stay in the cabinet.
5.
At the back of the VP 300 cabinet disconnect all cables attached to the
Motherboard Assembly. The cables should be marked so they can be
reattached to the same positions.
6.
Disconnect the power cord from the cabinet.
7.
Remove the four screws that secure the bottom panel to the cabinet and
remove the panel.
Cables that were disconnected from the MBA in step 5 are secured to the
bottom panel with cable ties. These cables can remain secure.
8.
Disconnect the power harness at the DDB to be removed. Do not disconnect
the other connectors on the power harness.
9.
Disconnect the short flat cable connectors attached to the DDB to be
removed. Do not disconnect the other connectors on the flat cables.
10. If the Shelf B DDB is being removed, disconnect the fan tray power harness.
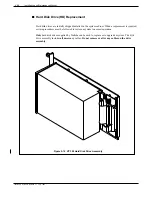
11. Remove the screws along the top and bottom edges of the DDB and remove
the DDB.
Installing Disk
To install the DDB follow the procedures described below.
Drive Backplane
◆
W A R N I N G
◆
It is critical that the DDB be aligned correctly for correct disk drive
assembly engagement to the DDB. To accomplish this follow the
instructions exactly.
1.
Hold the new DDB up to the cabinet and install a screw in the top, center
screw hole to hold it in place.
2.
Install the remaining screws along the top and bottom of the DDB so it is
just able to move with a minimal amount of distance between screw heads
DB. Screws should not be tightened at this time.
3.
From the front of the cabinet, push the Disk Drive Assembly into the
connectors on the Disk Drive Backplane.
4.
Tighten the screws on the top and bottom edges of the DDB.
Toshiba VP Systems Release 7.1
July, 1994
MAINTENANCE
5-91
Summary of Contents for VP 300
Page 2: ......
Page 10: ......
Page 14: ......
Page 20: ...Toshiba VP Systems Release 7 1 July 1994 ...
Page 52: ...Toshiba VP Systems Release 6 1 February 1993 2 14 Installation and Maintenance Manual ...
Page 56: ...Toshiba VP Systems Release 7 1 July 1994 ...
Page 146: ......
Page 312: ...Toshiba VP Systems Release 7 1 July 1994 ...
Page 314: ......
Page 444: ......
Page 496: ......
Page 542: ......
Page 598: ...Toshiba VP Systems Release 6 1 February 1993 ...
Page 600: ...Toshiba VP Systems Release 6 1 February 1993 ...


