■
Hard Disk Replace for Release 5.3 and Earlier
These procedures provide the steps to replace a hard disk drive on a system where the VP 300 is
configured as a multiple-drive system.
Action
VP 300 Description and Response
Replace the Hard
Disk
1.
Turn OFF the power to
the VP 300.
2.
Remove the hard disk(s)
to be replaced.
3.
Install the replacement
Refer to the MAINTENANCE chapter in this manual, Hardware
hard disk(s).
Replacement section.
Boot the System
4.
Make sure the Release 5
Software Diskette #1 is
write-protected.
5.
Insert the Release 5
Software Diskette #1
into the FD.
6.
Adjust the baud rate of
the terminal/teleprinter
to 300, 1200, or
9600 baud.
7.
Turn ON the power to
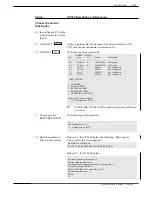
The following messages are printed:
the VP 300. With the
teleprinter baud rate
set, press
twice.
At this point, the VP 300 has completely booted from floppy.
CPU
Model 300-6004-101
Rev A1
. . . .. 05MB . . . . . . . . . . 1200 BAUD MODEM . . . . . .
BOOTING FROM FLOPPY DISK
. . XBOOT . . .
- - - - - - - - SYSTEM SOFTWARE RELEASE L.5.3.1 (MM/DD/YY) - - - - - - - -
DAY MM/DD HH:MM:SS YYYY ID:000 S/N:00000 PBX: 00
(MODEM ENABLED) LAST LOGON: MM/DD HH:MM
@WAITING FOR VCU READY
LOADING VCU WITH FILE F:VCU
VCU STARTED
SYSTEM INITIALIZATION SUSPENDED!
PASSWORD:
@
Enter
Toshiba VP Systems Release 7.1
July, 1994
PROCEDURES
6-65
Summary of Contents for VP 300
Page 2: ......
Page 10: ......
Page 14: ......
Page 20: ...Toshiba VP Systems Release 7 1 July 1994 ...
Page 52: ...Toshiba VP Systems Release 6 1 February 1993 2 14 Installation and Maintenance Manual ...
Page 56: ...Toshiba VP Systems Release 7 1 July 1994 ...
Page 146: ......
Page 312: ...Toshiba VP Systems Release 7 1 July 1994 ...
Page 314: ......
Page 444: ......
Page 496: ......
Page 542: ......
Page 598: ...Toshiba VP Systems Release 6 1 February 1993 ...
Page 600: ...Toshiba VP Systems Release 6 1 February 1993 ...


