◆
WARNING
◆
The hard disk drive assemblies are sensitive to static electricity. Do not attempt the
following procedures without wearing an anti-static wrist strap.
Removing Hard
To remove the HD, follow the procedures described below.
Disk Drive
1.
Unlock and open the door of the cabinet.
2.
Put on antistatic wrist strap. Connect it to an unpainted portion of the
cabinet.
3.
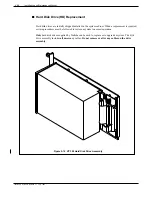
Locate the drive assembly to be removed.
4.
Using a flat-blade screwdriver, unscrew the two captive screws that secure
the hard disk drive to the cabinet.
5.
Gripping the front flange, pull the drive assembly out, use your free hand to
support the bottom of the drive when it clears the cabinet.
6.
Carefully place the drive assembly nearby to be reinstalled or shipped.
◆
WARNING
◆
The hard disk drive assemblies are sensitive to rough handling.
Care should be taken to handle them as gently as possible.
Installing Hard
To replace the hard disk drive, follow the procedures described below.
Disk Drive
☞
☞
Disk drive ID will automatically be selected when the drive assembly is
installed. Do not change jumpers on the disk drive.
1.
Put on antistatic wrist strap. Connect it to an unpainted portion of the
cabinet.
2.
Remove the new disk drive from the shipping container.
3.
Verify that the part number on the label attached to the sheetmetal plate of
the disk drive assembly agrees with what has been ordered (see table).
Toshiba VP Systems Release 7.1
July, 1994
MAINTENANCE
5-97
Summary of Contents for VP 300
Page 2: ......
Page 10: ......
Page 14: ......
Page 20: ...Toshiba VP Systems Release 7 1 July 1994 ...
Page 52: ...Toshiba VP Systems Release 6 1 February 1993 2 14 Installation and Maintenance Manual ...
Page 56: ...Toshiba VP Systems Release 7 1 July 1994 ...
Page 146: ......
Page 312: ...Toshiba VP Systems Release 7 1 July 1994 ...
Page 314: ......
Page 444: ......
Page 496: ......
Page 542: ......
Page 598: ...Toshiba VP Systems Release 6 1 February 1993 ...
Page 600: ...Toshiba VP Systems Release 6 1 February 1993 ...


