


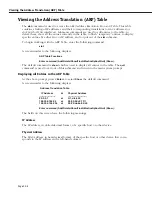


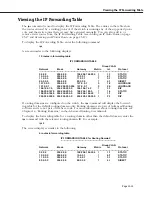

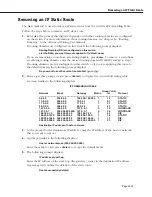
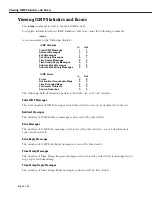


Viewing the Address Translation (ARP) Table
Page 25-9
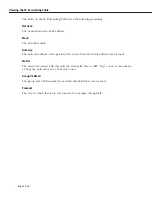
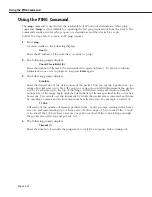
Adding Entries to the ARP Table
The
add
subcommand is used to manually add an IP address entry to the ARP Table. To be
able to manage your switch over an IP network connection, you will need at least one IP
address configured for the switch.
Follow the steps below to add an address to the ARP Table.
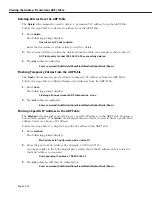
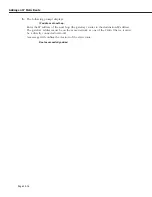
1.
Enter
add
.
The following prompt displays:
Host name or IP addr to add:
Enter the name of the host or its IP address.
2.
The following prompt displays:
Physical address (format aa:bb:cc:dd:ee:ff):
Enter the host’s physical address in hexadecimal format.
3.
The following prompt displays:
Publish (i.e., proxy for) this entry? (y/n) (n):
Enter
y
to publish (i.e., proxy for) this ARP entry. This feature allows the switch to answer
all ARP requests directed at the hosts on a subnetwork. As the “proxy” for these hosts, the
switch responds with its own MAC address whenever ARP requests come in for any of the
hosts on the subnetwork. Enter
n
if you do not want this ARP entry to act as a proxy.
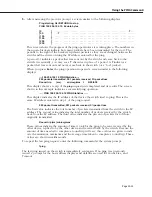
4.
The following prompt displays:
Is this entry permanent (ie. flush will not remove it) (y/n)? (n) :
Enter
y
if this entry is to be permanent (that is, you do not want it to be removed by the
Flush
subcommand). Enter
n
if the entry is to be temporary (that is, you want to allow it
to be removed by the
Flush
subcommand). All of the entries in the table, whether they are
permanent or temporary, survive across switch reboots. Therefore, you must use the
Delete
subcommand when you want to remove permanent entries from the table.
5.
The following prompt displays:
Use trailer encapsulation on this host (y/n)? (n) :
Enter
y
if you want to use trailer encapsulation on this host. Enter
n
if you do not want to
use trailer encapsulation on this host.
6.
The system then confirms the addition to the table (an example is shown below).
ARP table entry for host 198.206.184.35 successfully added
7.
The
xlat
submenu redisplays:
Enter command (Add/Delete/Show/Flush/Macfind/Ipfind/Quit) (Show) :
Summary of Contents for Omni Switch/Router
Page 1: ...Part No 060166 10 Rev C March 2005 Omni Switch Router User Manual Release 4 5 www alcatel com ...
Page 4: ...page iv ...
Page 110: ...WAN Modules Page 3 40 ...
Page 156: ...UI Table Filtering Using Search and Filter Commands Page 4 46 ...
Page 164: ...Using ZMODEM Page 5 8 ...
Page 186: ...Displaying and Setting the Swap State Page 6 22 ...
Page 202: ...Creating a New File System Page 7 16 ...
Page 270: ...Displaying Secure Access Entries in the MPM Log Page 10 14 ...
Page 430: ...OmniChannel Page 15 16 ...
Page 496: ...Configuring Source Route to Transparent Bridging Page 17 48 ...
Page 542: ...Dissimilar LAN Switching Capabilities Page 18 46 ...
Page 646: ...Application Example DHCP Policies Page 20 30 ...
Page 660: ...GMAP Page 21 14 ...
Page 710: ...Viewing the Virtual Interface of Multicast VLANs Page 23 16 ...
Page 722: ...Application Example 5 Page 24 12 ...
Page 788: ...Viewing UDP Relay Statistics Page 26 24 ...
Page 872: ...The WAN Port Software Menu Page 28 46 ...
Page 960: ...Deleting a PPP Entity Page 30 22 ...
Page 978: ...Displaying Link Status Page 31 18 ...
Page 988: ...Displaying ISDN Configuration Entry Status Page 32 10 ...
Page 1024: ...Backup Services Commands Page 34 14 ...
Page 1062: ...Diagnostic Test Cable Schematics Page 36 24 ...
Page 1072: ...Configuring a Switch with an MPX Page A 10 ...
Page 1086: ...Page B 14 ...
Page 1100: ...Page I 14 Index ...


