Changing Serial Port Communication Parameters
Page 6-2
Changing Serial Port Communication Parameters
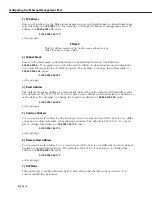
The serial communications parameters for the two
MPX
ports are set by default to the follow-
ing:
• 9600 bits per second (bps)
• 8 data bits
• 1 stop bit
• no parity
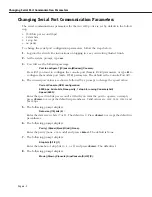
To change the serial port configuration parameters, follow the steps below:
1.
Log into the switch. For instructions on logging in, see your
Getting Started Guide
.
2.
At the system prompt, type
ser
.
3.
You will see the following message:
Port to configure? {(C)onsole,(M)odem} (Console) :
Press
C
if you want to configure the console port (female, DCE) parameters, or type
M
to
configure the modem port (male, DTE) parameters. The default is the Console Port (
C
).
4.
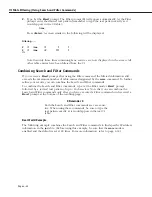
The current port values are shown, followed by a prompt to change the speed value.
Current Console (DCE) configuration:
9600 bps, 8 data bits, None parity, 1 stop bit, running Console (shell)
Speed (9600):
Enter the speed (in bits per second) at which you want the port to operate, or simply
press
<Enter>
to accept the default in parentheses. Valid values are
1200
,
9600
,
19200
, and
38400
bps.
5.
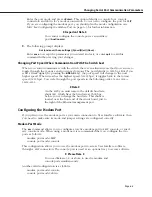
The following prompt displays:
Data size {7/8} bits (8) :
Enter the data size in bits (7 or 8). The default is 8. Press
<Enter>
to accept the default in
parentheses.
6.
The following prompt displays:
Parity { (N)one/(E)ven/(O)dd } (None) :
Enter the parity (none, even, odd) and press
<Enter>
. The default is None.
7.
The following prompt displays:
Stop bits {0/1/2} (1):
Enter the number of stop bits (0, 1, or 2) and press
<Enter>
. The default is 1.
8.
The following prompt displays:
Mode {(D)own,(C)onsole,(A)uxConsole,(S)LIP} (C) :
Summary of Contents for Omni Switch/Router
Page 1: ...Part No 060166 10 Rev C March 2005 Omni Switch Router User Manual Release 4 5 www alcatel com ...
Page 4: ...page iv ...
Page 110: ...WAN Modules Page 3 40 ...
Page 156: ...UI Table Filtering Using Search and Filter Commands Page 4 46 ...
Page 164: ...Using ZMODEM Page 5 8 ...
Page 186: ...Displaying and Setting the Swap State Page 6 22 ...
Page 202: ...Creating a New File System Page 7 16 ...
Page 270: ...Displaying Secure Access Entries in the MPM Log Page 10 14 ...
Page 430: ...OmniChannel Page 15 16 ...
Page 496: ...Configuring Source Route to Transparent Bridging Page 17 48 ...
Page 542: ...Dissimilar LAN Switching Capabilities Page 18 46 ...
Page 646: ...Application Example DHCP Policies Page 20 30 ...
Page 660: ...GMAP Page 21 14 ...
Page 710: ...Viewing the Virtual Interface of Multicast VLANs Page 23 16 ...
Page 722: ...Application Example 5 Page 24 12 ...
Page 788: ...Viewing UDP Relay Statistics Page 26 24 ...
Page 872: ...The WAN Port Software Menu Page 28 46 ...
Page 960: ...Deleting a PPP Entity Page 30 22 ...
Page 978: ...Displaying Link Status Page 31 18 ...
Page 988: ...Displaying ISDN Configuration Entry Status Page 32 10 ...
Page 1024: ...Backup Services Commands Page 34 14 ...
Page 1062: ...Diagnostic Test Cable Schematics Page 36 24 ...
Page 1072: ...Configuring a Switch with an MPX Page A 10 ...
Page 1086: ...Page B 14 ...
Page 1100: ...Page I 14 Index ...

