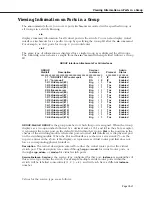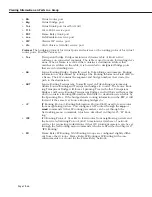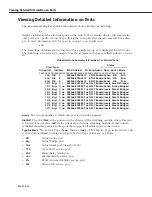
Adding Virtual Ports
Page 19-44
Adding Virtual Ports
You can add virtual ports to a Group at any time after the Group is created. The
addvp
command allows you to add one or more ports to a Group you specify. If you have used the
crgp
command to add virtual ports, then you will find the
addvp
command fields very famil-
iar.
To use
addvp
, enter the command followed by the Group number to which you want to add
the port. Next, specify the port or ports you want to add.
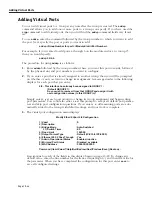
addvp <Group Number for port> <Module Slot>/<Port Number>
For example, if you wanted to add ports 4 through 6 on the module in slot 4 to Group #5,
then you would specify:
addvp 5 4/4-6
The procedure for using
addvp
is as follows:
1.
Enter
addvp
followed by the Group number where you want this port to reside, followed
by the physical slot and port numbers you want to configure.
2.
If you enter a port that is already assigned to another Group, then you will be prompted
on whether or not you want to change its assignment. A message similar to the following
displays for each port that you enter:
4/4 - This interface has already been assigned to GROUP 1 -
(Default GROUP #1).
Do you wish to remove it from that GROUP and assign it (with
new configuration values) to this GROUP (n)?
Simply enter a
y
at each port prompt to change its Group assignment and begin setting
port parameters. You could also enter a
c
at this prompt to accept all default port parame-
ters and skip port configuration questions. If you enter a
c
,
all
remaining ports are auto-
matically added to the Group with default settings, and your work is complete.
3.
The virtual port configuration menu displays:
Modify Ether/8 Vport 4/4 Configuration
1) Vport
: 9
2) Description
:
3) Bridge Mode
: Auto-Switched
31) Switch Timer
: 60
4) Flood Limit
: 192000
5) Output Format Type
: Default (IP-Eth II, IPX-802.3)
6) Ethernet 802.2 Pass Through
: Yes
7) Admin, Operational Status
: Enabled, inactive
8) Mirrored Port Status
: Disabled, available
9) MAC Address
: 000000:000000
Command {Item=Value/?/Help/Quit/Redraw/Next/Previous/Save} (Redraw) :
Descriptions for each of the fields in this display begin on page 19-29. To change any
default value, enter the line number for the item, an equal sign (=), and then the value for
the parameter. When you have completed the configuration for this port, enter
save
to
save all configured settings.
Summary of Contents for Omni Switch/Router
Page 1: ...Part No 060166 10 Rev C March 2005 Omni Switch Router User Manual Release 4 5 www alcatel com ...
Page 4: ...page iv ...
Page 110: ...WAN Modules Page 3 40 ...
Page 156: ...UI Table Filtering Using Search and Filter Commands Page 4 46 ...
Page 164: ...Using ZMODEM Page 5 8 ...
Page 186: ...Displaying and Setting the Swap State Page 6 22 ...
Page 202: ...Creating a New File System Page 7 16 ...
Page 270: ...Displaying Secure Access Entries in the MPM Log Page 10 14 ...
Page 430: ...OmniChannel Page 15 16 ...
Page 496: ...Configuring Source Route to Transparent Bridging Page 17 48 ...
Page 542: ...Dissimilar LAN Switching Capabilities Page 18 46 ...
Page 646: ...Application Example DHCP Policies Page 20 30 ...
Page 660: ...GMAP Page 21 14 ...
Page 710: ...Viewing the Virtual Interface of Multicast VLANs Page 23 16 ...
Page 722: ...Application Example 5 Page 24 12 ...
Page 788: ...Viewing UDP Relay Statistics Page 26 24 ...
Page 872: ...The WAN Port Software Menu Page 28 46 ...
Page 960: ...Deleting a PPP Entity Page 30 22 ...
Page 978: ...Displaying Link Status Page 31 18 ...
Page 988: ...Displaying ISDN Configuration Entry Status Page 32 10 ...
Page 1024: ...Backup Services Commands Page 34 14 ...
Page 1062: ...Diagnostic Test Cable Schematics Page 36 24 ...
Page 1072: ...Configuring a Switch with an MPX Page A 10 ...
Page 1086: ...Page B 14 ...
Page 1100: ...Page I 14 Index ...

