Using ZMODEM
Page 5-7
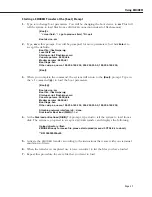
Starting a ZMODEM Transfer at the [boot] Prompt
1.
Type
c
to change boot parameters. You will be changing the boot device to
zm
. This will
tell the system to load files from a
ZMODEM
connection instead of flash memory.
[Boot]: c
‘.’ = clear field; ‘-’ = go to previous field; ^D = quit
Boot device : zm
2.
Type
zm
at this prompt. You will be prompted for more parameters. Just hit
<Enter>
to
accept the defaults.
Boot file : /flash/mpx.img
Local SLIP adr :
Startup script: /flash/mpx.cmd
Console params : 9600,n8lc
Modem params : 9600,n8l
Boot flags :0xb
Other: dvip:no_name, 198.206.183.253, 255.255.255.0, 198.206.183.255;
[Boot]:
3.
When you complete the command, the system will return to the
[Boot]:
prompt. Type in
the “at” command (
@
) to load the boot parameters.
[Boot]: @
Boot device : zm
Boot file : /flash/mpx.img
Startup script: /flash/mpx.cmd
Console params : 9600,n8lc
Modem params : 9600,n8l
Boot flags :0xb
Other: dvip:no_name, 198.206.183.253, 255.255.255.0, 198.206.183.255;
Attaching network interface lo0... done.
Disk load or Boot load (D/B/Q)? -> d
4.
At the
Disk load or Boot load {D/B/Q}? ->
prompt, type in
d
to tell the system to load from a
disk. The system is prepared to accept a
ZMODEM
transfer, and displays the following:
Upload directory: /flash
ZMODEM ready to receive file, please start upload (or send 5 CTRL-X’s to abort).
**B0100000023be50
5.
Activate the
ZMODEM
transfer according to the instructions that came with your terminal
emulation software.
6.
When the transfer is completed use
L
(case sensitive) to list the files you have loaded.
7.
Repeat this procedure for every file that you want to load.
Summary of Contents for Omni Switch/Router
Page 1: ...Part No 060166 10 Rev C March 2005 Omni Switch Router User Manual Release 4 5 www alcatel com ...
Page 4: ...page iv ...
Page 110: ...WAN Modules Page 3 40 ...
Page 156: ...UI Table Filtering Using Search and Filter Commands Page 4 46 ...
Page 164: ...Using ZMODEM Page 5 8 ...
Page 186: ...Displaying and Setting the Swap State Page 6 22 ...
Page 202: ...Creating a New File System Page 7 16 ...
Page 270: ...Displaying Secure Access Entries in the MPM Log Page 10 14 ...
Page 430: ...OmniChannel Page 15 16 ...
Page 496: ...Configuring Source Route to Transparent Bridging Page 17 48 ...
Page 542: ...Dissimilar LAN Switching Capabilities Page 18 46 ...
Page 646: ...Application Example DHCP Policies Page 20 30 ...
Page 660: ...GMAP Page 21 14 ...
Page 710: ...Viewing the Virtual Interface of Multicast VLANs Page 23 16 ...
Page 722: ...Application Example 5 Page 24 12 ...
Page 788: ...Viewing UDP Relay Statistics Page 26 24 ...
Page 872: ...The WAN Port Software Menu Page 28 46 ...
Page 960: ...Deleting a PPP Entity Page 30 22 ...
Page 978: ...Displaying Link Status Page 31 18 ...
Page 988: ...Displaying ISDN Configuration Entry Status Page 32 10 ...
Page 1024: ...Backup Services Commands Page 34 14 ...
Page 1062: ...Diagnostic Test Cable Schematics Page 36 24 ...
Page 1072: ...Configuring a Switch with an MPX Page A 10 ...
Page 1086: ...Page B 14 ...
Page 1100: ...Page I 14 Index ...

