Installation
8-80
CardioMD Service Manual
1MAN0158-H11 04-2005 CSIP Level 1
Procedure Details
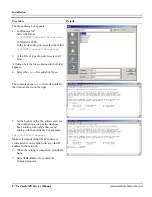
The New node dialog appears.
8.
Fill in the fields of the dialog as indicated
in the example on the right.
Note
. The values to be entered depend on the
name and IP address of the processing station.
9.
To enable automatic transfer of study files
to the processing station, select the Yes
radio button at the bottom of the New
node dialog.
When this option is selected, study files are
automatically exported to the processing
station whenever a study is completed. Further
details are available in the CardioMD
Operator’s Manual Chapter 4
Operating
Instructions
.
10.
Click Save.
11.
In the Nodes configuration dialog, click
Exit.
The configuration is now complete.
12.
To make the changes take effect, reboot
the CardioMD acquisition PC.
DICOM Setup on the Processing Station
Please refer to the installation and/or configuration procedures in the documentation
accompanying the processing station.
The DICOM configuration of the database host (host adac) must be:
Remote Server
description – CardioMD
host name – cardiomd
TCP port# - 104
Calling AE title – adac
Called AE title – PC
Query cache – 0
Host in Pegasys – yes
Local Server
description – ADAC_SCP@adac
hostname – adac IP 192.9.200.1
TCP port# – 104
Called AE title – adac
Admitted calling AE’s – *
Admitted hosts – *
Summary of Contents for CARDIOMD
Page 1: ...CARDIOMD SERVICE MANUAL 1MAN0158 H11 04 2005 CSIP Level 1 ...
Page 10: ...Introduction x CardioMD Service Manual 1MAN0158 H11 04 2005 CSIP Level 1 ...
Page 16: ...Safe Operating Practices 1 6 CardioMD Service Manual 1MAN0158 H11 04 2005 CSIP Level 1 ...
Page 164: ...Detector Calibration Files 5 60 CardioMD Service Manual 1MAN0158 H11 04 2005 CSIP Level 1 ...
Page 328: ...Installation Procedures 9 38 CardioMD Service Manual 1MAN0158 H11 04 2005 CSIP Level 1 ...
Page 348: ...Planned Maintenance Procedures 11 6 CardioMD Service Manual 1MAN0158 H11 04 2005 CSIP Level 1 ...
Page 465: ......


