Detector Repairs
6-8
CardioMD Service Manual
1MAN0158-H11 04-2005 CSIP Level 1
6.3.5
Replacing PMT’s
WARNING
Changing PMT’s should only be carried out using safety glasses and rubber
gloves.
Note
. New PMT’s supplied as spare parts look different from PMT’s installed in older CardioMD
systems. The changes in appearance of PMT’s are due solely to requirements in production and
have no effect on the functioning of PMT’s. Old PMT’s can be replaced with new ones without
problems. See also Chapter 9
Spare Parts
for details.
Procedure Details
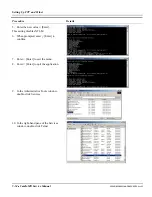
1.
Disassemble the detector as far as
described above.
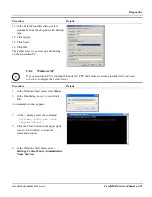
2.
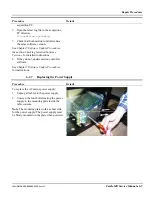
Remove all six PMT strips and the power
strip.
3.
Disconnect all cables and remove the
cable bracket.
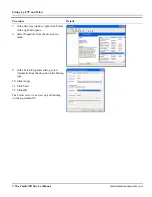
4.
Unscrew the 8 M6 screws to remove the
strip mounting plate.
5.
Remove the rubber light seal tube along
the edges.
Note
. When reassembling, take care that the
tube is being firmly pressed between the PMT
support plate and the strip mounting plate. The
tube light seals the detector.
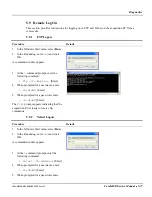
6.
Remove the four screws along the short
edges of the PMT support plate, and lift
the support plate out.
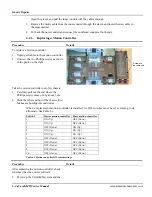
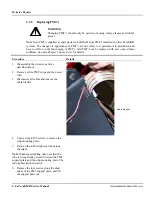
Cable bracket
Summary of Contents for CARDIOMD
Page 1: ...CARDIOMD SERVICE MANUAL 1MAN0158 H11 04 2005 CSIP Level 1 ...
Page 10: ...Introduction x CardioMD Service Manual 1MAN0158 H11 04 2005 CSIP Level 1 ...
Page 16: ...Safe Operating Practices 1 6 CardioMD Service Manual 1MAN0158 H11 04 2005 CSIP Level 1 ...
Page 164: ...Detector Calibration Files 5 60 CardioMD Service Manual 1MAN0158 H11 04 2005 CSIP Level 1 ...
Page 328: ...Installation Procedures 9 38 CardioMD Service Manual 1MAN0158 H11 04 2005 CSIP Level 1 ...
Page 348: ...Planned Maintenance Procedures 11 6 CardioMD Service Manual 1MAN0158 H11 04 2005 CSIP Level 1 ...
Page 465: ......

