DIESEL ENGINE, MUFFLER, FUEL SYSTEM, AND CLUTCHES
Diesel Engine
Page 13c-4
2007 Carryall 295/295 SE & XRT 1550/1550 SE Gasoline, Diesel and IntelliTach M & S Manual
13C
7. Install the clutch outer cover.
See Clutch Outer Cover Installation on page 13c-35.
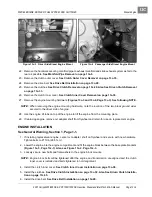
8. Using new gasket, slide exhaust system forward and secure the manifold pipe to the exhaust manifold.
See Manifold Pipe Installation on page 13c-6.
9. Tighten the hardware that secures the muffler.
See Muffler Installation on page 13c-7.
10. Attach the air filter outlet hose to the intake manifold.
See Air Filter Outlet Hose Installation on
page 13c-26.
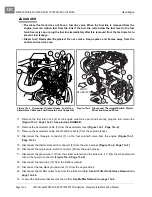
11. Connect the two black ground wires (13) to the engine block and tighten the bolt to 39 ft-lb (53 N·m).
12. Connect the red wires (12) to starter solenoid and tighten the nut and lock washer to 90 in-lb (10.3 N·m).
13. Connect the green wire (10) to the starter solenoid and the blue wire (11) to the white solenoid wire
(Figure 13c-2, Page 13c-2)
.
14. Connect the oil pressure switch connector (9) to the wire harness.
15. Connect the thermostat switch connector (8) to the wire harness
(Figure 13c-2, Page 13c-2)
.
16. Connect the fuel solenoid valve three-pin connector (7) to the engine
(Figure 13c-1, Page 13c-2)
.
17. Connect the accelerator cable sheath (6) to the engine bracket
(Figure 13c-1, Page 13c-2)
.
18. Connect the accelerator cable (5) to the throttle lever.
19. Remove the plug and secure the fuel return line (4) to the engine relief valve with a new clamp
(Figure 13c-1, Page 13c-2)
.
See following DANGER.
ý
DANGER
• Diesel fuel! Flammable! Explosive! Do not smoke. Keep sparks and flames away from the
vehicle and service area.
• To prevent fuel from siphoning, keep the fuel supply line above the fuel level in the fuel tank
when removing the plug.
20. Remove the plug and secure the fuel supply line (3) to the fuel injector assembly with a new clamp
(Figure 13c-1, Page 13c-2)
.
See previous DANGER.
21. Attach the overflow/bypass hose (2) to the thermostat cover and secure with new clamp.
22. Attach the upper (1) and lower radiator hoses to the engine and secure with new clamps.
23. Refill the engine and radiator coolant system.
See Engine Coolant Change, Section 15, Page 15-1.
24. Install seat frame and lower ROPS (Roll Over Protection Structure).
See Seat Support Installation,
Section 4, Page 4-10.
25. Install the upper ROPS frame.
See ROPS Installation, Section 4, Page 4-8.
26. Install the cargo bed.
See Cargo Bed Installation, Section 4, Page 4-12.
27. Check the engine oil level.
See Engine Oil Level Check, Section 10a, Page 10a-8.
28. Connect the battery cables, positive (+) cable first, and tighten the hardware to 144 in-lb (16 N·m). Coat
terminals with Battery Terminal Protector Spray (CCI P/N 1014305).
29. Adjust the engine RPM setting if required.
See Engine RPM Adjustment on page 13c-20.
30. Install both seats.
31. Test-drive the vehicle to ensure all systems are functional and adjusted correctly.
Содержание IntelliTach XRT 1550
Страница 2: ......
Страница 22: ...1...
Страница 54: ...4...
Страница 60: ...5...
Страница 90: ...6...
Страница 114: ...8...
Страница 118: ...9...
Страница 196: ...11A...
Страница 290: ...11C...
Страница 468: ...13C...
Страница 490: ...14...
Страница 498: ...15...
Страница 548: ...16...
Страница 560: ...Club Car R NOTES...
Страница 561: ...Club Car R NOTES...
Страница 562: ...Club Car R NOTES...
Страница 563: ......


