ELECTRICAL COMPONENTS: DIESEL VEHICLES
Fan
2007 Carryall 295/295 SE & XRT 1550/1550 SE Gasoline, Diesel and IntelliTach M & S Manual
Page 12c-19
12C
FAN
See General Warning, Section 1, Page 1-1.
Testing the Fan Motor
See Test Procedure 12, Section 11c, Page 11c-27.
Fan Removal
1. Turn the key switch OFF and remove the key. Set the park brake and chock the wheels.
2. Disconnect the battery cables as instructed.
See WARNING “To avoid unintentionally starting...” in
See General Warning, Section 1, Page 1-1.
3. Raise the hood.
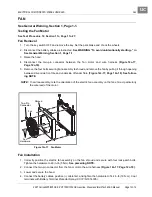
4. Disconnect the two-pin connector between the fan motor and wire harness
(Figure 12c-17,
Page 12c-19)
.
5. Remove the four bolts securing fan assembly to shroud and remove the fan by pulling it through opening
between driver side front tire and underside of fender flare
(Figure 12c-17, Page 12c-19)
.
See follow-
ing NOTE.
NOTE:
To aid reassembly, note the orientation of the electric fan assembly on the fan shroud, particularly
the wire lead of the motor.
Fan Installation
1. Correctly position the electric fan assembly on the fan shroud and secure with four lock-patch bolts.
Tighten the hardware to 48 in-lb (5 N·m).
See preceding NOTE.
2. Connect the two-pin connector from the fan motor to the wire harness
(Figure 12c-17, Page 12c-19)
.
3. Lower and secure the hood.
4. Connect the battery cables, positive (+) cable first, and tighten the hardware to 144 in-lb (16 N·m). Coat
terminals with Battery Terminal Protector Spray (CCI P/N 1014305).
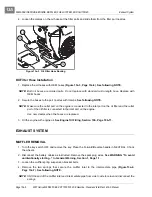
Figure 12c-17 Fan Motor
Fan
Two-Pin
Connector
Fan
Hardware
Shroud
Содержание IntelliTach XRT 1550
Страница 2: ......
Страница 22: ...1...
Страница 54: ...4...
Страница 60: ...5...
Страница 90: ...6...
Страница 114: ...8...
Страница 118: ...9...
Страница 196: ...11A...
Страница 290: ...11C...
Страница 468: ...13C...
Страница 490: ...14...
Страница 498: ...15...
Страница 548: ...16...
Страница 560: ...Club Car R NOTES...
Страница 561: ...Club Car R NOTES...
Страница 562: ...Club Car R NOTES...
Страница 563: ......

