OVERLAY
Using the Overlay function
307
RIVAGE PM10 Operation Manual
■
Controlling the function from the touch screen
1.
Press the [OVERLAY] key.
The OVERLAY SETTING screen will appear.
(You can also access this screen by pressing the SCENE field on the menu bar, and then
pressing the Overlay tab at the top of the SCENE LIST screen.)
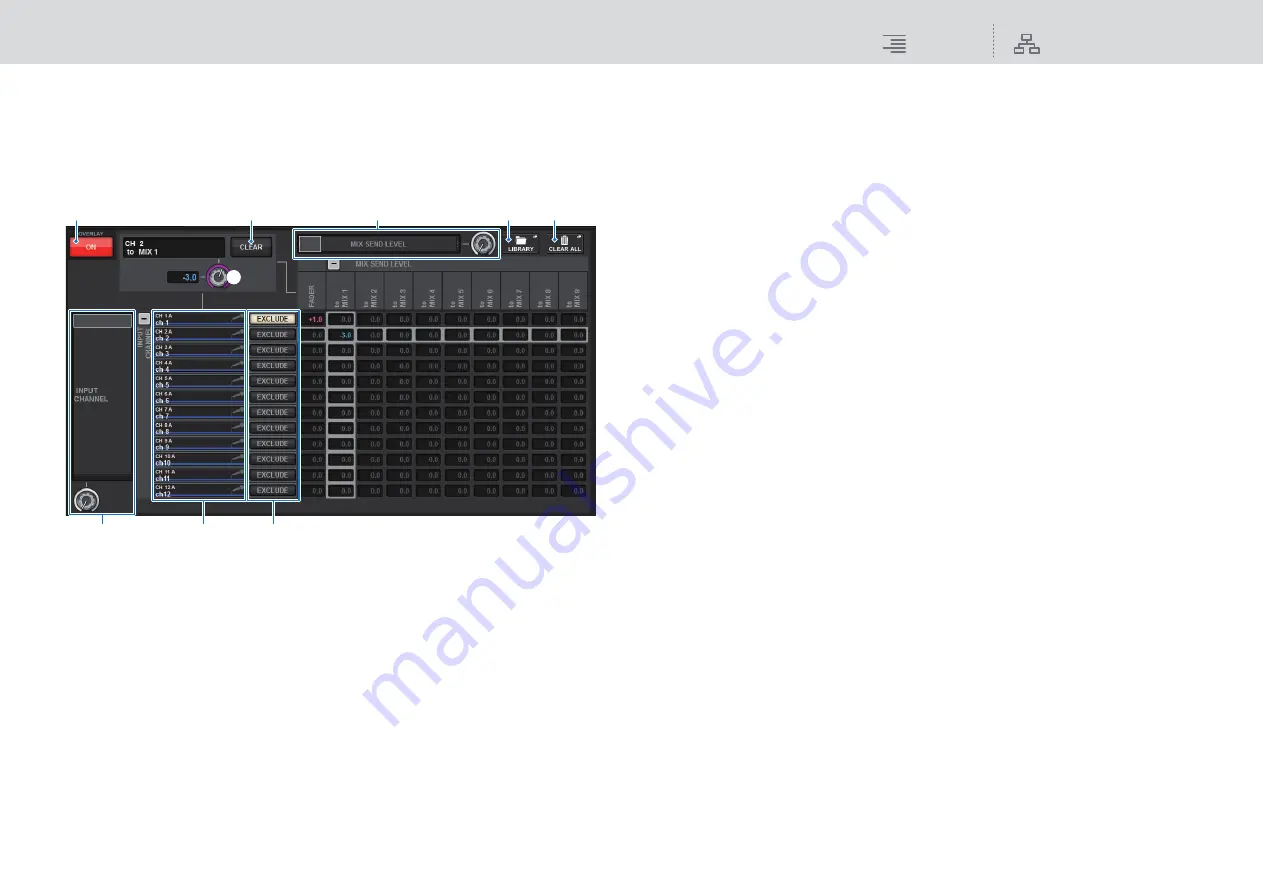
This screen contains the following items.
1
Overlay ON button
Turn this button on to enable the offset value.
2
CLEAR button
Press this button to clear the selected parameter setting.
3
Overlay parameter setting knob
While Overlay is turned on, you can set the value between -20.00dB and +10.00dB.
4
Category select list (channel)
Enables you to select the channel category. The categories correspond to the following
channels.
•
CH1-144
•
MIX1-72
•
MTX1-36
•
STEREO
.........................ST A L, ST A R, ST B L, ST B R
•
DCA GROUPS
..............DCA1-24
You can press the + or − button located to the right to expand or collapse the channel
parameter indication for each category.
5
Channel display
Indicates the channel name.
6
EXCLUDE button
If the EXCLUDE button is turned on, the corresponding channel will be excluded from the
Overlay target.
7
Category select list (parameter)
Enables you to select the parameter category. The categories correspond to the following
parameters.
• Fader
• Mix Send1 Level-Mix Send 72 Level
• Matrix Send1 Level-Matrix Send 36 Level
You can press the + or − button located beneath the list to expand or collapse the channel
parameter indication for each category.
8
LIBRARY button
Press this button to open the OVERLAY library window.
9
CLEAR ALL button
Press this button to clear all specified parameters, other than the EXCLUDE parameter.
2.
Press the Overlay ON button to enable Overlay.
3.
Select a channel or DCA and parameter to set the Overlay offset value.
A selected field will be surrounded by a frame.
3
8
7
4
5
6
9
2
1


