Plug-ins
About plug-ins
231
RIVAGE PM10 Operation Manual
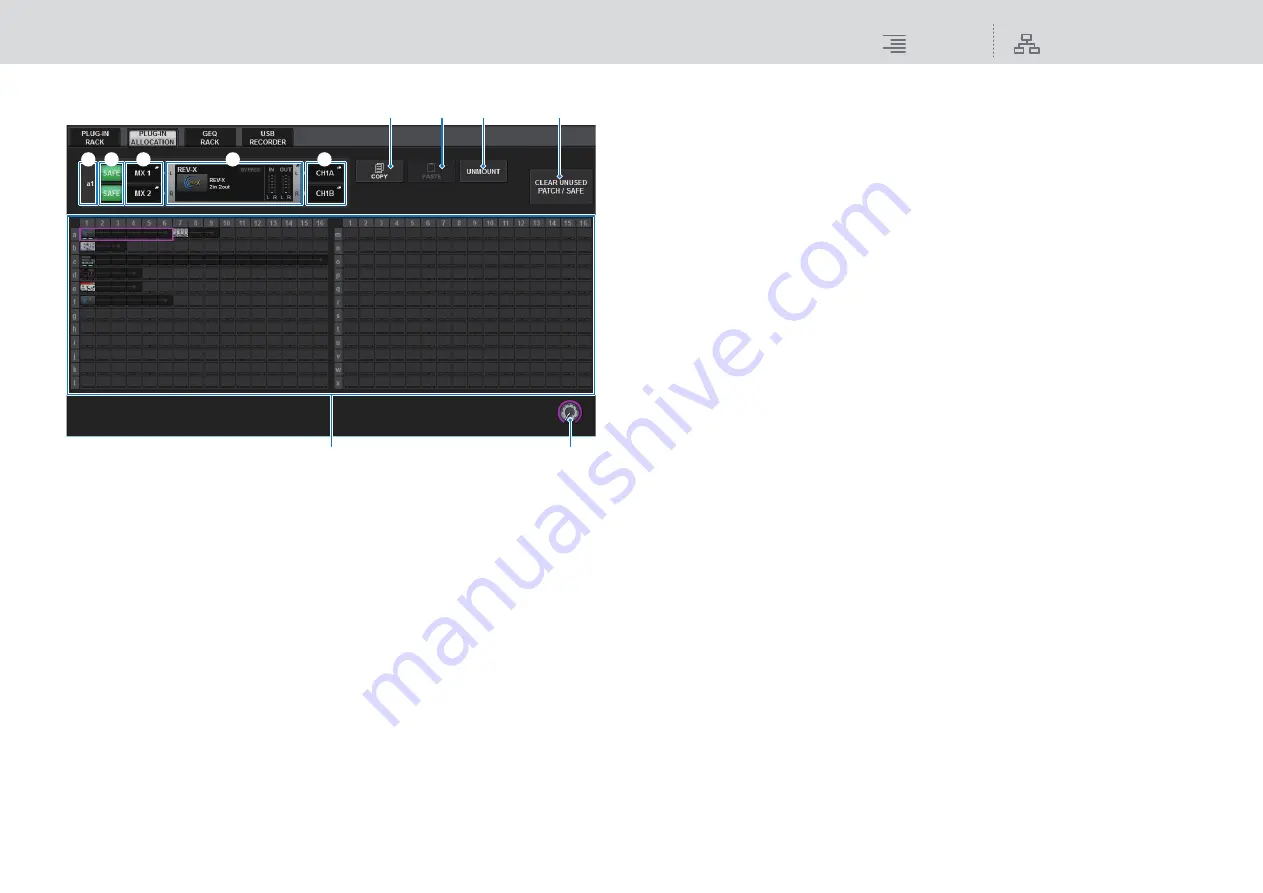
You can view the plug-in resource allocation on the PLUG-IN ALLOCATION screen.
This screen contains the following items.
1
Plug-in allocation number
Indicates the locations of the allocated plug-ins (expressed by the row name <a-x> and the
column number).
2
SAFE button (L/R)
Switches Recall Safe on/off for the rack.
3
INPUT popup buttons (L/R)
Press these buttons to access the INPUT PATCH popup window, in which you can select a
signal to patch to the L/R channel.
4
RACK MOUNT popup button
Press this button to access the popup window of the currently-selected plug-in.
While a plug-in is not allocated in the selected location, press this button to display the RACK
MOUNT popup window, in which you can select a plug-in to mount.
5
OUTPUT popup buttons (L/R)
Press these buttons to access the OUTPUT PATCH popup window, in which you can select a
signal to patch to the L/R channel.
6
COPY button
Use this button to copy the currently-selected plug-in when you want to mount a single plug-
in in multiple locations.
7
PASTE button
Use this button to paste the copied plug-in to the selected location.
8
UNMOUNT button
Use this button to unmount the currently-selected plug-in.
9
CLEAR UNUSED PATCH/SAFE button
Use this button to cancel unused patches or recall safe.
)
Plug-in allocation field
Indicates the plug-in allocation status. You can view 384 available DSP resources at a glance.
The currently-selected plug-in is indicated in a pink frame.
!
Plug-in allocation number
Allocates plug-ins. You can also allocate plug-ins by tapping the touch screens.
!
)
6
7
8
9
1
3
5
4
2


