Plug-ins
Using plug-ins
233
RIVAGE PM10 Operation Manual
4.
In the RACK MOUNT popup window, use the PLUG-IN select buttons to select
the item you want to mount, and then press the OK button.
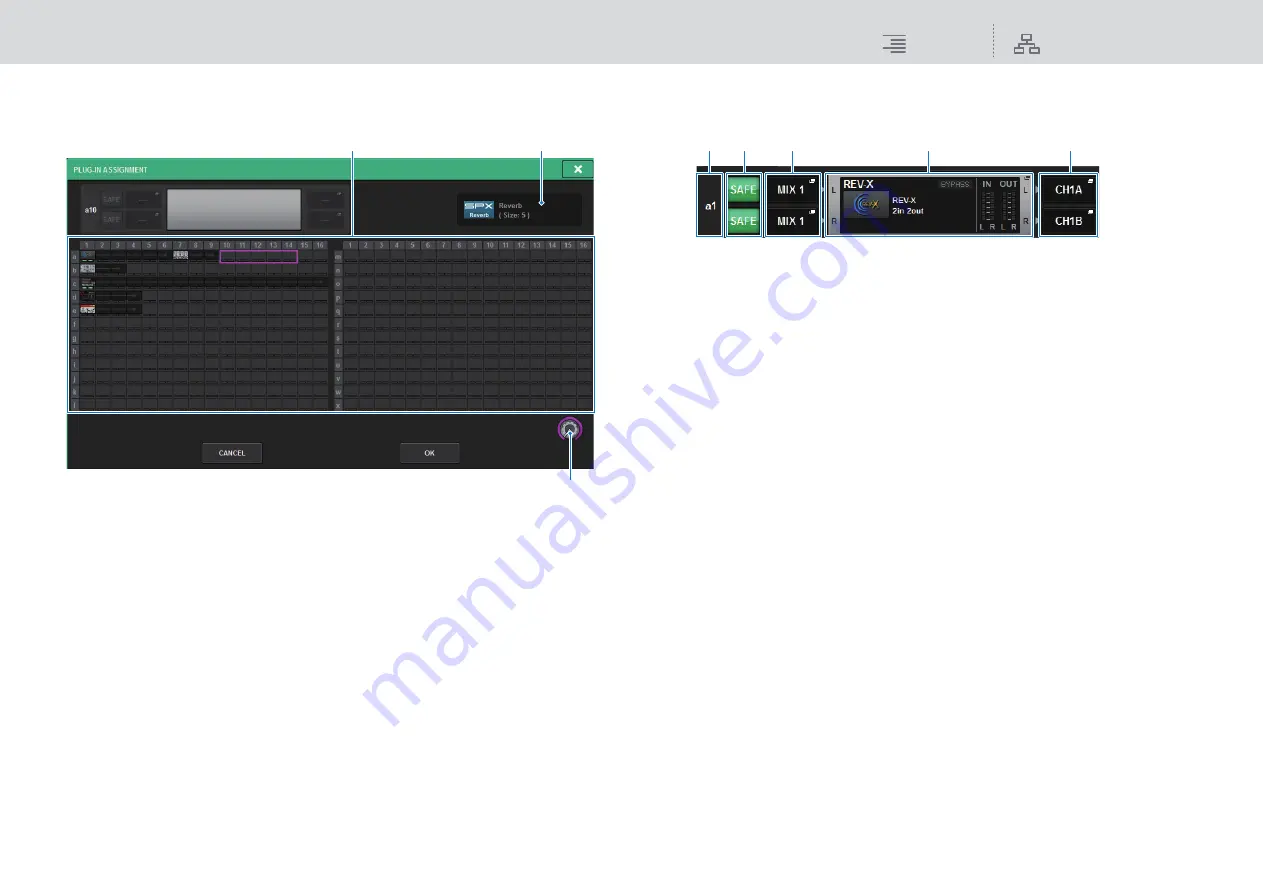
The PLUG-IN ASSIGNMENT popup window appears.
This screen contains the following items.
1
Plug-in allocation field
Indicates the plug-in allocation status. You can view 384 available DSP resources at a glance.
A location to which you can allocate the selected plug-in is indicated in a pink frame. A gray
frame means you cannot allocate the selected plug-in to that location.
2
Plug-in allocation knob
Allocates plug-ins. You can also allocate plug-ins by tapping the touch screens.
3
Plug-in indicator
Indicates the plug-in to be allocated.
5.
Rotate the plug-in allocation knob to specify the location for the plug-in
(indicated in a pink frame).
6.
Press the OK button to allocate the plug-in.
If you decide to cancel the operation, press the CANCEL button instead of the OK button.
The mounted plug-in is displayed.
This screen contains the following items.
1
Plug-in allocation number
Indicates the locations of plug-ins (expressed by the row name <a-x> and the column
number).
2
SAFE button (L/R)
Switches Recall Safe on/off for the rack.
3
INPUT popup buttons (L/R)
Press these buttons to access the INPUT PATCH popup window, in which you can select a
signal to patch to the L/R channel.
4
RACK MOUNT popup button
Press this button to access the popup window of the currently-selected plug-in.
5
OUTPUT popup buttons (L/R)
Press these buttons to access the OUTPUT PATCH popup window, in which you can select a
signal to patch to the L/R channel.
7.
Press the INPUT popup button.
8.
In the INPUT PATCH popup window, select the input source and then press the x
button to close the window.
9.
Press the OUTPUT popup button.
10.
In the OUTPUT PATCH popup window, select the output destination and then
press the x button to close the window.
1
2
3
1
2
3
4
5


