Monitor
MONITOR
136
RIVAGE PM10 Operation Manual
• DIMMER ON button
Turn on this button to enable the dimmer function and attenuate the monitor signal.
3
PHONES LEVEL LINK button
If this button is on, the MONITOR FADER LEVEL knob will adjust the level of signals sent to
the PHONES A or PHONES B output jack.
4
MONITOR SOURCE SELECT buttons
Enable you to select one of the DEFINE 1–8 sources that will be output to the MONITOR bus.
5
MONITOR FADER LEVEL knob
Adjusts the monitor fader level.
6
MONITOR OUTPUT button
Switches Monitor Out on or off.
7
Meter field
Indicates the output level of Monitor Out channels L, R, and C. Press this field to open the
MONITOR SETTINGS popup window.
3.
Press the MONITOR popup button or the meter field to open the MONITOR
SETTINGS popup window.
In the MONITOR SETTINGS popup window you can make detailed monitoring settings.
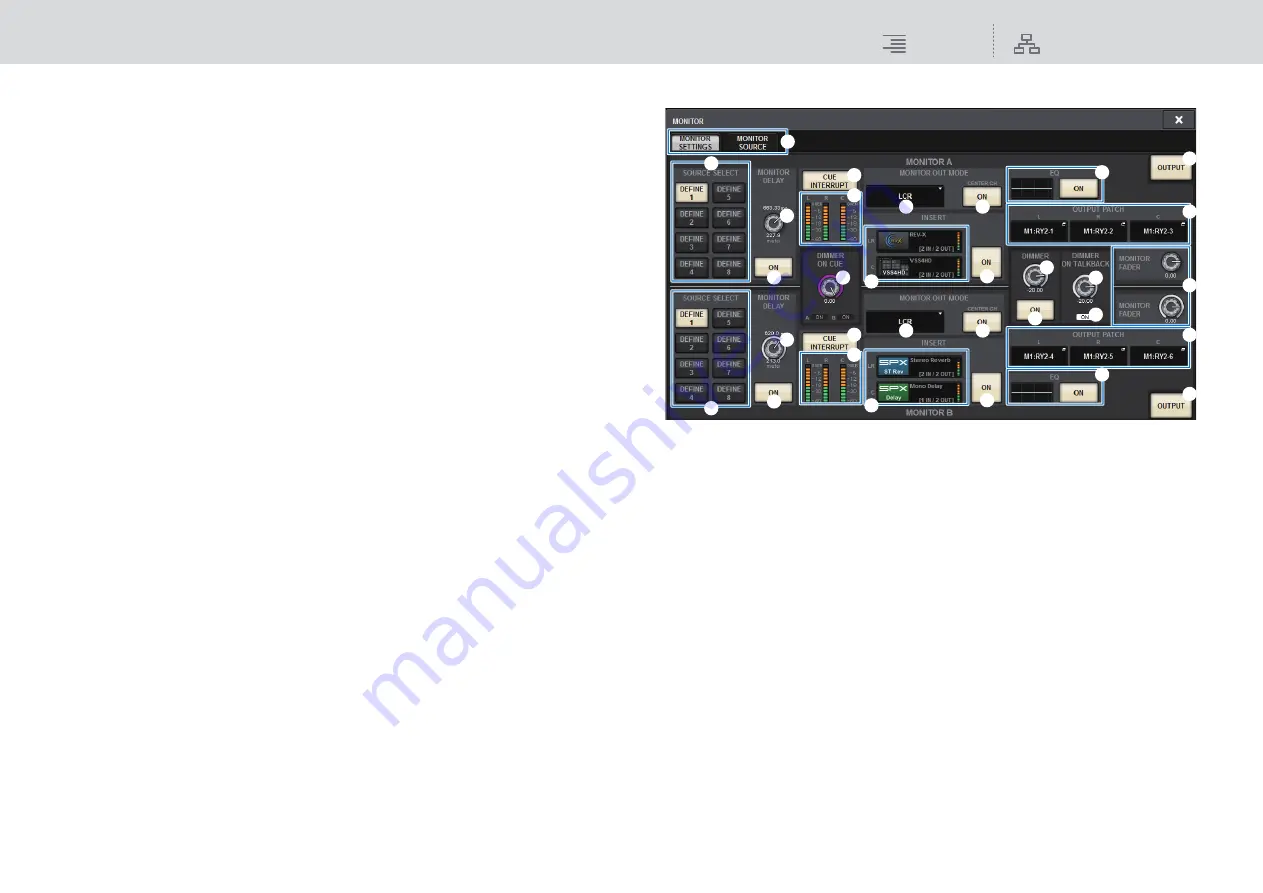
MONITOR SETTINGS popup window
1
SOURCE SELECT DEFINE buttons
Enable you to select one of the DEFINE 1–8 sources that will be output to the MONITOR bus.
2
MONITOR DELAY knob
Indicates the currently-specified delay time. The millisecond value is indicated above the
knob, and the delay time value in currently-selected units and the currently-selected scale type
are indicated below the knob. However if the scale is set to ms, the delay time value is not
shown above the knob.
3
MONITOR DELAY ON button
If this button is on, the monitor signal will be delayed according to the setting of the
MONITOR DELAY knob.
4
CUE INTERRUPT button
Press this button to interrupt the monitor signal by the cue signal. If this button is on and the
cue is enabled, the cue signal will be sent to the monitor output.
5
Meters
This field indicates the output level of the monitor L/R/C channels.
1
(
2
$
4
7
6
8
9
7
6
8
9
%
&
*
^
5
4
5
3
1
2
3
)
#
!
!
@
@
)


