CH Parameter
DELAY
188
RIVAGE PM10 Operation Manual
■
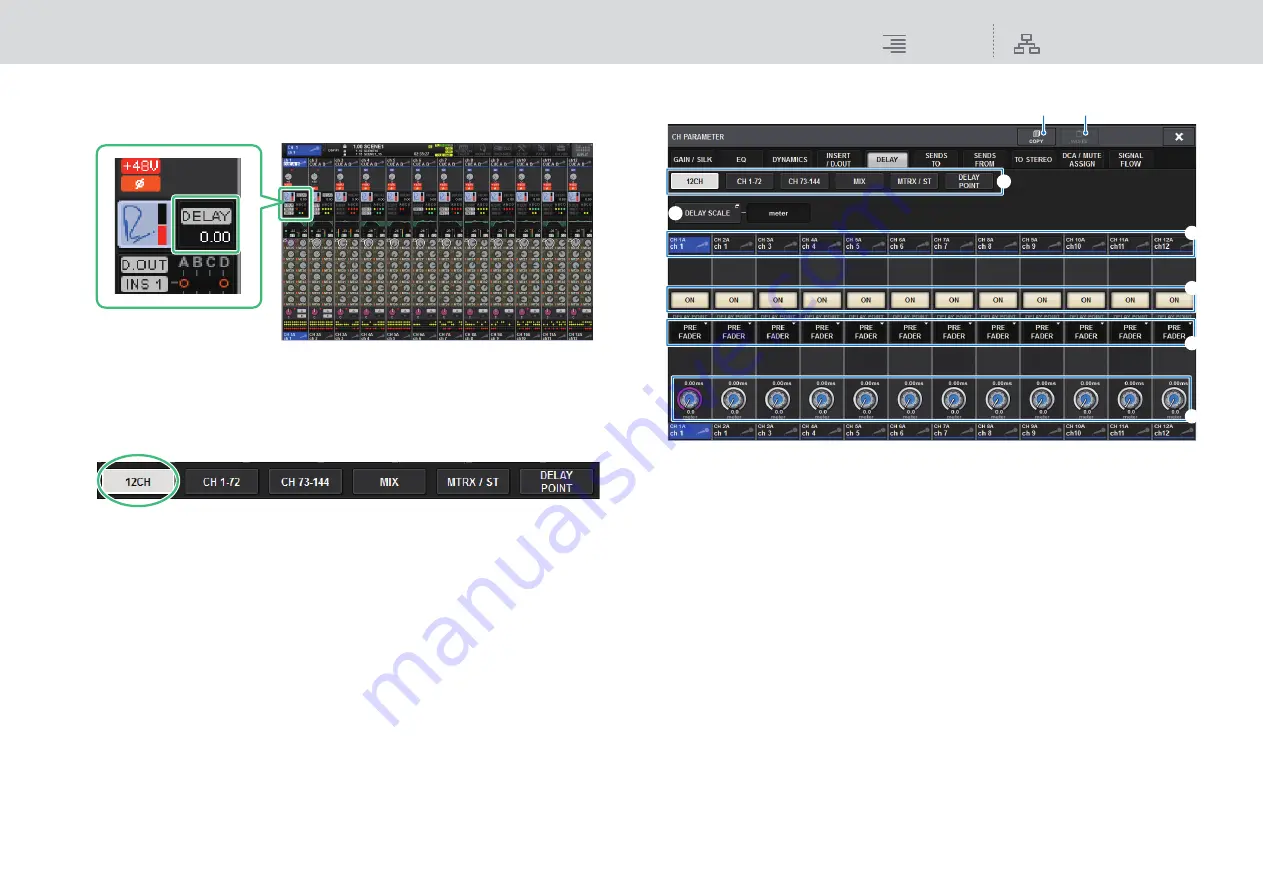
Controlling the delay via the OVERVIEW screen
1.
Press the [VIEW] key to access the OVERVIEW screen.
2.
Press the DELAY field to access the DELAY popup window.
This window includes several pages, which you can switch between using the tabs located at
the top of the window.
3.
Press the 12CH tab to open the DELAY popup window (12CH).
4.
Use the on-screen buttons, screen encoders, and the [TOUCH AND TURN] knob
to set the delay.
5.
Perform the same operations for other channels as desired.
If you are viewing the 12ch DELAY popup window, you can use the Layer Select keys to switch
the channels being controlled in groups of twelve. You can also press the meter area to switch
channels.
6.
When you finish making settings, press the X symbol in the upper right of the
window.
DELAY popup window (12ch)
1
DELAY SCALE popup button
Press this button to access the DELAY SCALE popup window (
), in which you can
select the unit for the delay time.
2
Channel select buttons
Each button will light to indicate that the corresponding channel is selected. Press the button
to select the channel.
3
DELAY ON buttons
Switch delay on or off.
4
Delay insert point select buttons
Enable you to select the delay insert point from the following: PRE HPF, PRE EQ, PRE DYN1,
PRE DYN2, PRE FADER, POST FADER.
5
Delay setting knobs
Indicate the channel delay value. Use the corresponding screen encoder or the [TOUCH AND
TURN] knob to adjust the parameters. You can view the current value immediately above the
knob (always shown in unit of ms) and below the knob (shown using the currently-selected
scale). Press the knob to display a popup window, in which you can set the delay time.
NOTE
If msec (millisecond) has been selected for the DELAY SCALE, nothing will appear above the
knob.
OVERVIEW screen
DELAY field
6
2
3
4
5
1
8
7


