CH Parameter
DYNAMICS
176
RIVAGE PM10 Operation Manual
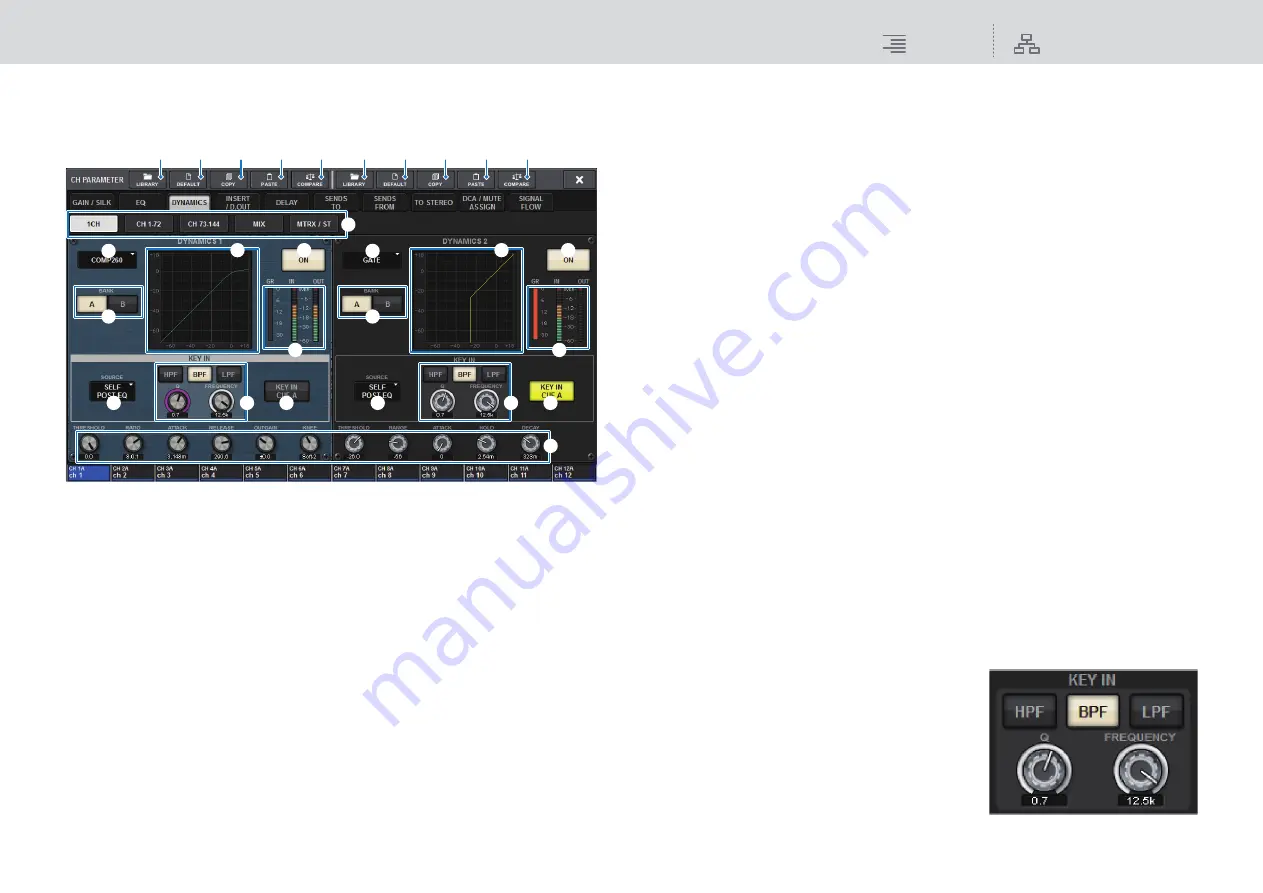
DYNAMICS 1/2 popup window (1CH)
All dynamics parameters can be viewed and edited. This is convenient when you want to make
detailed dynamics settings for a specific channel.
1
Tabs
Use these tabs to select a channel that you want to view on the screen.
2
LIBRARY button
Press this button to open the DYNAMICS library window.
3
DEFAULT button
Press this button to reset all dynamics parameters to the initial values.
4
COPY button
Copies the dynamics parameter settings stored in the bank (selected via the A/B switching
buttons) to buffer memory.
5
PASTE button
Press this button to paste the settings that were copied in buffer memory to the dynamics of
the currently-selected bank. If valid data has not been copied into buffer memory, you will be
unable to paste it.
NOTE
You can copy and paste the parameters between Dynamics 1 and Dynamics 2.
6
COMPARE button
Press this button to switch between and compare the settings stored in buffer memory and the
currently-selected settings. If valid data has not been stored in buffer memory, you will be
unable to compare the data.
7
Dynamics processor type button
Enables you to select the dynamics processor type from the following: LEGACY COMP,
COMP260, GATE, DE-ESSER, EXPANDER, DUCKING.
8
A/B switch buttons
Enable you to switch between A and B as the storing destination for the dynamics parameters.
9
Dynamics graph
Displays the input/output response of the dynamics processors.
)
DYNAMICS ON/OFF button
Switches the dynamics processor on or off.
!
Dynamics IN/OUT level meters, GR meter
These meters indicate the peak level of the signals before and after the dynamics processing,
and the amount of gain reduction. For a stereo channel, these meters indicate the level of both
the L and R channels.
@
KEY IN SOURCE select button
Enables you to select one of the following as the key-in signal that will trigger dynamics
processing.
•
SELF PRE EQ
................The pre-EQ signal of the same channel
•
SELF POST EQ
.............The post-EQ signal of the same channel
•
OTHER PRE EQ
...........The signal immediately after the EQ of other input or output
channels
•
DIRECT INPUT
...........Press this button to access the INPUT PATCH window that enables
you to select the key-in signal.
#
KEY IN FILTER field
(This area will not appear if DE-ESSER is selected.)
Enables you to make various settings for a filter that lets the key-in signal pass.
• Filter select buttons
Select the type of filter from HPF, BPF, or LPF. To
disable the filter, press the button that is turned on.
• Q knob
Indicates the filter Q setting. Use the screen
encoder to adjust the value.
• FREQUENCY knob
Indicates the cutoff frequency of the filter. Use the
screen encoder to adjust the value.
3
2
4
5
3
2
4
5
6
6
1
%
)
9
7
8
@
#
$
!
)
9
7
8
@
#
$
!


