Plug-ins
Using plug-ins
232
RIVAGE PM10 Operation Manual
Using plug-ins
1.
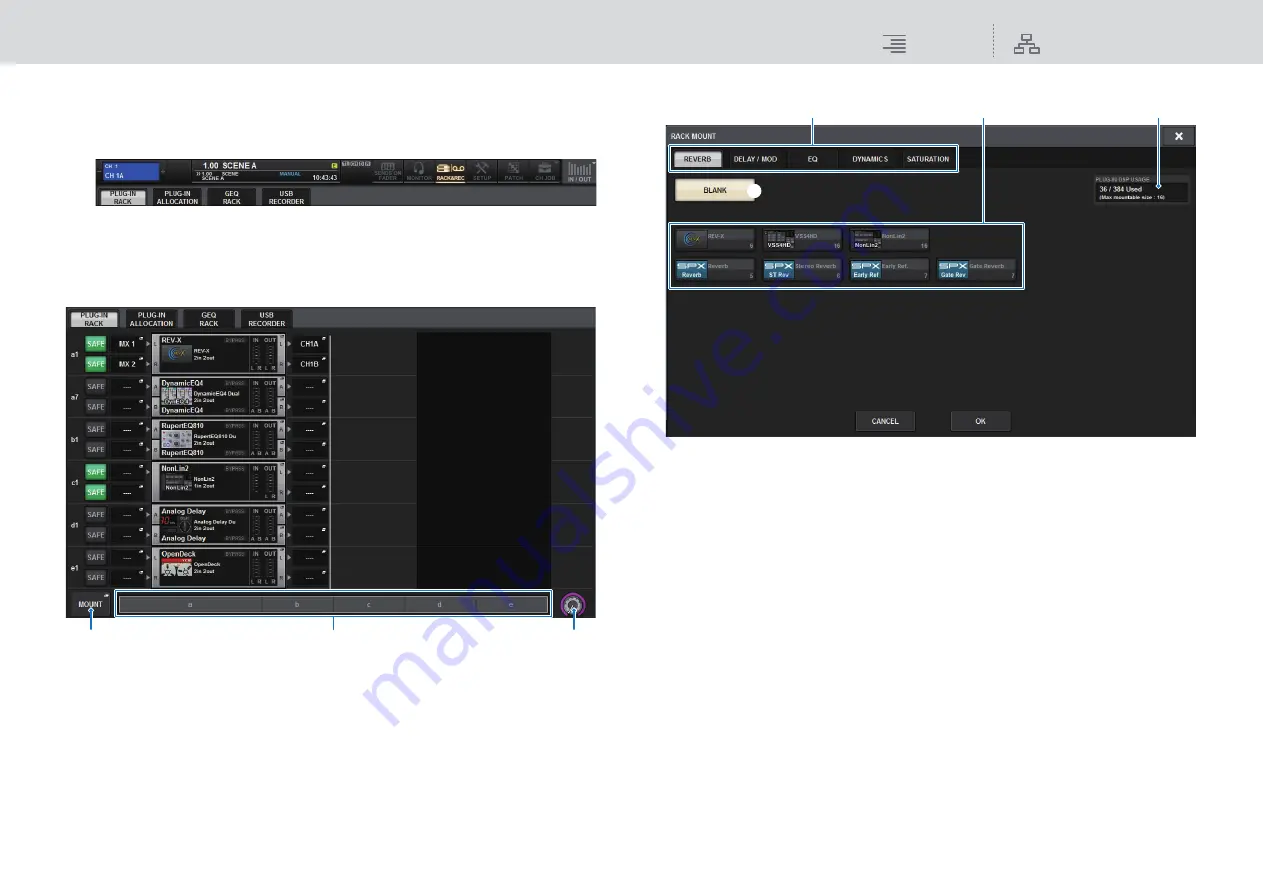
Press the RACK&REC button on the menu bar to access the RACK&REC screen.
This window includes several pages, which you can switch between using the tabs located at
the top of the window.
2.
Press the PLUG-IN RACK tab on the RACK&REC screen that displays plug-ins.
The PLUG-IN RACK page of the RACK&REC screen appears.
This screen contains the following items.
1
MOUNT popup button
Press this button to display the RACK MOUNT popup window, in which you can select a
plug-in to mount.
2
Plug-in allocation bar
You can view the plug-in allocation status at a glance.
3
Rack select knob
Use the corresponding screen encoder or the [TOUCH AND TURN] knob to select a rack.
3.
Press the MOUNT popup button.
The RACK MOUNT popup window appears.
NOTE
The RACK MOUNT popup window is displayed on only one of the bays.
This screen contains the following items.
1
Category select tabs
Enable you to select the category of plug-in that will be mounted in the rack.
2
BLANK button
Unmounts the plug-in from the rack.
NOTE
If you open this window by pressing the MOUNT button on the PLUG-IN RACK page, you will
see this BLANK button and be able to select a plug-in to unmount. However, if you press the
BLANK button, a message will appear and you will be unable to unmount the plug-in.
To unmount a specific plug-in, open the plug-in popup window for the corresponding RACK, and
then press the MOUNT button to display the RACK MOUNT popup window, in which you can
select a plug-in to unmount.
3
PLUG-IN select buttons
Select the plug-in that will be mounted in the rack.
4
PLUG-IN DSP USAGE indication
Shows the state of plug-in resource usage.
3
1
2
3
4
2
1


