System Setup
SYSTEM CONFIG
107
RIVAGE PM10 Operation Manual
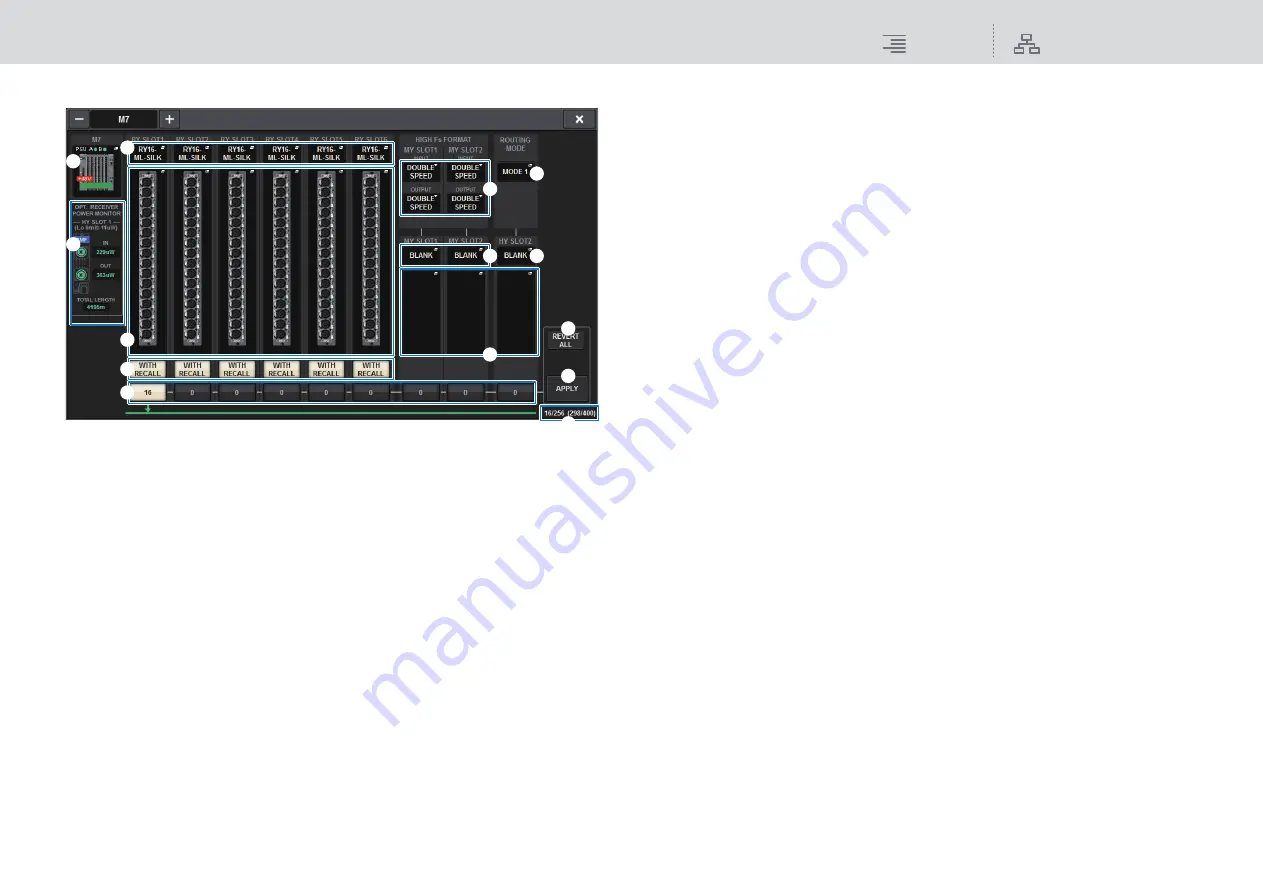
I/O rack settings popup window
1
I/O rack select popup buttons
These buttons represent the I/O racks that are connected to the system. Press one of these
buttons to access a popup window, in which you can select an I/O rack.
The row at the top of the button shows the power supply status of POWER A and B (green: power
on, red: power off). The device icon indicates the status of +48V MASTER (red: on; grey: off),
and also the status of the device (green: normal; yellow: abnormal; red: critical error).
2
Optical reception power status display
This section indicates the power status and readings of the optical receiver for communication
on the TWINLANe network.
Green
: Normal
Yellow
: Low optical reception power
Red “LOW”
: No reception
It also indicates the type of HY cards (MMF:HY256-TL; SMF:HY256-TL-SMF) and the total
length of the cables.
3
RY SLOT (1–6) popup buttons
Press a button to open the RY CARD SELECT popup window, in which you can select an RY
card.
4
MY SLOT (1–2) popup buttons
Press a button to open the MY CARD SELECT popup window, in which you can select a Mini-
YGDAI card.
5
HY SLOT (2) popup button
Press the button to open the HY CARD SELECT popup window, in which you can select an
HY card.
6
HIGH Fs FORMAT select buttons
When a Mini-YGDAI card is using high sampling (88.2 kHz, 96 kHz), these buttons enable
you to select the operating mode as DOUBLE SPEED, DOUBLE CHANNEL, or SINGLE for
IN and OUT respectively.
NOTE
This function is not applicable if an MY card that does not support high sampling is specified.
7
Parameter settings popup buttons
Press a button to open a popup window, in which you can set the parameters of each card.
8
WITH RECALL buttons
If a button is on, scene data is applied to the HA device when scene recall occurs. Turn this off
if you do not want HA gain settings to be recalled (for example, if all HA settings are controlled
from the monitor console, turn this button for the FoH).
9
TWINLANe assign buttons
When you press a button, the number of channels used by the selected slot will be assigned to
TWINLANe (or the assignment will be canceled).
For an HY slot, a window in which you can make settings in 16-channel units will appear.
NOTE
• Bandwidth for an I/O rack can be assigned to the TWINLANe network only for a DSP engine
that is the word clock master of the system.
If the assignment is unavailable, the button will be disabled.
• You must assign the number of channels required for input signals (that is, signals output to
the TWINLANe network). You do not need to assign bandwidth to an RY slot that has an
RY16-DA card installed, nor to a slot that has an output-only MY card installed.
)
REVERT ALL button
If you press this button, all changes in channel assignments that you made up to that point will
be canceled, reverting to the state prior to the changes.
!
APPLY button
If you press this button, the channel assignment changes you made will be applied to the
TWINLANe network.
@
TWINLANe channel count indication
Indicates the total number of channels currently used by the TWINLANe network.
#
ROUTING MODE switch button
Press this button to open a popup window, in which you can switch the routing mode for HY
slot 2.
)
1
2
!
@
3
7
8
9
6
4
7
5
#


