GEQ/PEQ/Automixer
Graphic EQ, parametric EQ and Automixer
218
RIVAGE PM10 Operation Manual
1
BLANK button
Defeat the currently-inserted GEQ/PEQ.
2
Used slots indicator
Indicates the number of slots that are being used.
3
MODULE SELECT
Use these buttons to select the GEQ or PEQ that will be inserted. Each button has the following
function.
•
31BandGEQ button
.....Inserts a 31BandGEQ in the specified channel.
•
Flex15GEQ button
.......Inserts a Flex15GEQ in the specified channel.
•
8Band PEQ button
.......Inserts a 8Band PEQ in the specified channel.
4
CANCEL button
Cancels the changes you made in the INSERT popup window, and closes the window.
5
OK button
Applies the changes you made in the INSERT popup window, and closes the window.
6.
Use the MODULE SELECT buttons to select the item you want to insert, and then
press the OK button.
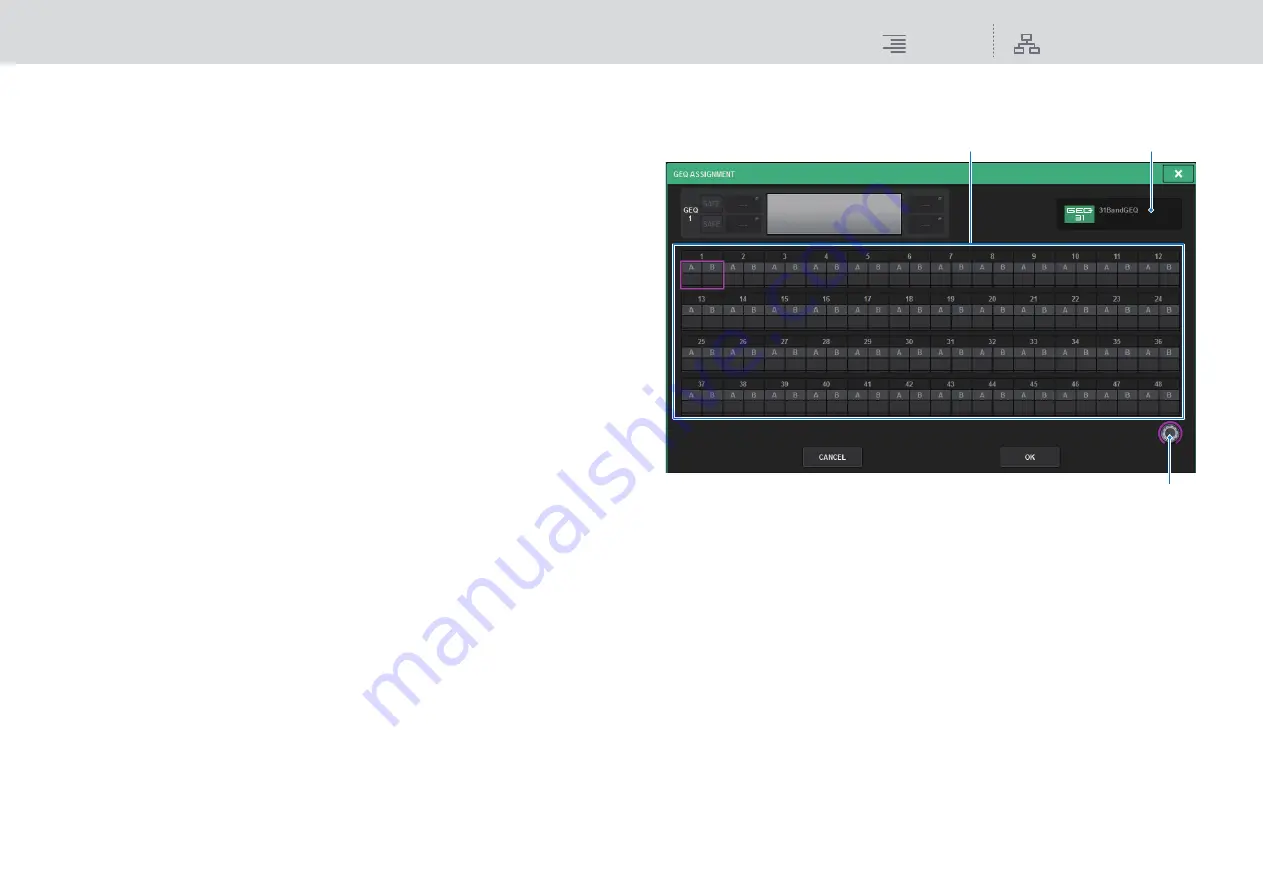
The GEQ_ASSIGNMENT popup window will appear.
This screen contains the following items.
1
GEQ/PEQ allocation field
Indicates the GEQ/PEQ allocation status. You can view 48 available DSP resources at a glance.
A location to which you can allocate GEQ/PEQ is indicated in a pink frame. A gray frame
means a GEQ/PEQ cannot be allocated to that location.
2
GEQ/PEQ allocation knob
Allocates GEQ/PEQ. You can also allocate them by tapping the touch screens.
3
GEQ/PEQ name
Indicates the name of GEQ/PEQ to be allocated.
7.
Rotate the GEQ/PEQ allocation knob to specify the location for GEQ/PEQ
(indicated in a pink frame).
8.
Press the OK button to allocate GEQ/PEQ.
If you decide to cancel the operation, press the CANCEL button instead of the OK button.
The inserted GEQ/PEQ will be displayed.
3
1
2


