DREAMWEAVER CS3
User Guide
484
Create a Spry table
There are two types of Spry tables: a simple table and a dynamic master table that binds a detail region to it in order
to allow dynamic updating of data on a Dreamweaver page.
If you are creating a simple table, you can set one or more columns as sortable and define CSS styles for various table
elements.
The process for creating a dynamic master table is the same as the process for creating a simple table; with a master
table, however, you can bind a detail dynamic region to the table so that when a user clicks on a row in the master
table, data in the detail region is dynamically updated.
To build a dynamic master Spry table, first you insert a master table, which displays the data used to trigger the
dynamic changes, and then you insert a detail region, which contains the data that undergoes change.
1
Select Insert > Spry > Spry Table.
You can also click the Spry Table button in the Spry category in the Insert bar.
2
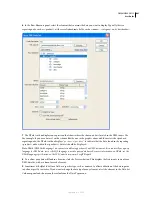
Choose your Spry data set from the menu.
Note:
If you try to insert a table but you haven’t created a region, Dreamweaver prompts you to add one before inserting
the table. All Spry data objects must be contained within regions.
3
In the Columns panel, adjust the columns for your table by doing the following:
•
Click the plus (+) or minus (-) signs to add or subtract columns.
•
Click the up or down arrows to move a column. Moving a column up moves it further left in the displayed table;
moving a column down moves it to the right.
4
To define a column to sort on, select it in the Columns panel and choose Sort Column When Header Is Clicked.
Repeat this for each column you want to sort on.
5
If you have CSS styles associated with your page, either as an attached style sheet or as a set of individual styles in
your HTML page, you can choose a CSS class for one or more of the following options:
O
dd Row Class
Changes the appearance of the odd-numbered rows.
Even Row Class
Changes the appearance of the even-numbered rows.
Hover Class
Changes the appearance of a row when you move the mouse over it.
Select Class
Changes the appearance of a row when you click on it.
Note:
The order of the odd, even, hover, and select classes in your style sheet is very important. The rules should be in
the exact order indicated above (odd, even, hover, select). If the hover rule appears below the select rule in the style sheet,
the hover effect won’t appear until the user mouses over a different row. If the hover and select rules appear above the
even and odd rules in the style sheet, the even and odd effects will not work at all. You can drag rules in the CSS panel
to order them correctly, or you can manipulate the CSS code directly.
6
If you are creating a simple Spry Table, deselect the default option, Update Detail Region When Row Is Clicked.
Keep the option selected if you are creating a dynamic master Spry table.
Note:
If you are inserting a dynamic master table, you can see in Code view that Dreamweaver has inserted HTML table
tags and a spry:repeat tag with an onClick operation for the current row. This is how Spry determines where the user
clicked and which data to update dynamically.
September 4, 2007

