DREAMWEAVER CS3
User Guide
450
The CSS and JavaScript files associated with a given widget are named after the widget, so it’s easy for you to know
which files correspond to which widgets. (For example, the files associated with the Accordion widget are called
SpryAccordion.css and SpryAccordion.js). When you insert a widget in a saved page, Dreamweaver creates a
SpryAssets directory in your site, and saves the corresponding JavaScript and CSS files to that location.
For a tutorial on using Spry widgets, see
www.adobe.com/go/vid0167
.
See also
“Understanding Cascading Style Sheets” on page 120
Insert a Spry widget
❖
Select Insert > Spry, and select the widget to insert.
When you insert a widget, Dreamweaver automatically includes the necessary Spry JavaScript and CSS files in your
site when you save the page.
Note:
You can also insert Spry widgets by using the Spry category in the Insert bar.
Select a Spry widget
1
Hold the mouse pointer over the widget until you see the widget’s blue tabbed outline.
2
Click the widget’s tab at the upper-left corner of the widget.
Edit a Spry widget
❖
Select the widget to edit and make your changes in the Property inspector (Window > Properties).
For details on making changes to specific widgets, see the appropriate sections for each widget.
Style a Spry widget
❖
Locate the appropriate CSS file for the widget in the SpryAssets folder of your site, and edit the CSS according to
your preferences.
For details on styling specific widgets, see the appropriate customization sections for each widget.
You can also format a Spry widget by editing styles in the CSS panel, just as you would for any other styled element
on the page.
Change the default Spry assets folder
When you insert a Spry widget, data set, or effect in a saved page, Dreamweaver creates a SpryAssets directory in
your site, and saves the corresponding JavaScript and CSS files to that location. You can change the default location
where Dreamweaver saves Spry assets if you prefer to save them somewhere else.
1
Select Sites > Manage Sites.
2
Select your site in the Manage Sites dialog box and click Edit.
3
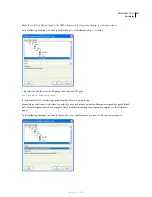
Select the Spry category in the Site Definition dialog box.
4
Enter a path to the folder you want to use for Spry assets and click OK. You can also click the folder icon to browse
to a location.
September 4, 2007

