


Replacement
7-51
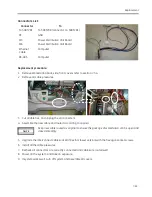
5075009 for 5075929/5075930
5085918 for 5075967
2.
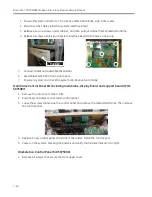
Take out and replace the new power supply.
3.
Connect the cables and reassemble the Image intensifier cover.
4.
Refer to 7.3.2 calibration matrix and chapter 4 to do calibration and checks.
5.
After calibration and check, shut down system and reinstall covers removed in above steps.
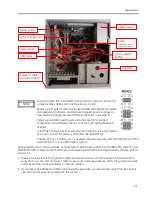
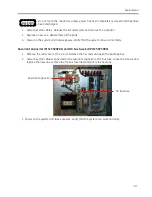
Ensure the cable tightly connect to the Image intensifier Power Supply. Virtual connection
will lead to no image or image vibration in Fluoro.
Summary of Contents for Brivo OEC 715
Page 2: ......
Page 19: ...Chapter1 Introduction and Safety...
Page 41: ...Introduction and Safety 23 46 54 20 18 26...
Page 55: ...Chapter2 System Overview...
Page 137: ...Chapter3 Installation...
Page 212: ...Chapter4 Calibration...
Page 275: ...Brivo OEC 715 785 865 Mobile C Arm X Ray Product Service Manual 4 64...
Page 284: ...Chapter5 Software...
Page 326: ...Software 5 43 2 Click on install to continue 3 Click Next to continue...
Page 335: ...Chapter6 Troubleshooting...
Page 408: ...Chapter7 Replacement...
Page 418: ...Replacement 7 11 166...
Page 488: ...Chapter8 Periodic Maintenance...
Page 502: ...Periodic Maintenance 8 15...
Page 505: ...Chapter9 Technical Reference...
Page 521: ...Technical Reference 9 17 Vertical configuration 1 5m Vertical configuration 1m...
Page 526: ...11 Appendix System Schematics...


